Call options
- ModPlus floating menu or palette
- AutoCAD ribbon
- Command line: _mpTableFromEntities
Icon
Related news and articles
Using
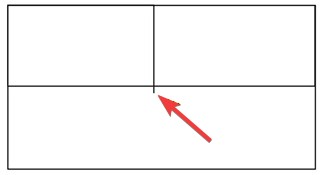
The Plugin allows you to create a table from primitives. To create a table, at least two vertical and two horizontal lines are required. If several text objects fall into one cell, they are combined into a single text object. When the plugin is launched, a settings window appears:
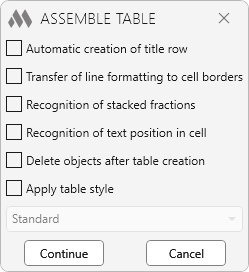
Automatic creation of title row – if a text object is selected above the table at a certain permissible distance, it will be automatically added to the new top row of the table as a header using the cell style "Title".
Transfer of line formatting to cell borders – applies the thickness and style of the lines forming the table to the cell borders. If a line has zero thickness and gray color (index 8), the cell will be assigned an invisible border.
Recognition of stacked fractions – analyzes the selected objects for the presence of split fractions with a horizontal bar and converts them into cells with the correct representation in the form of a fraction.
Recognition of text position in cell – when enabled, analyzes the position of the text in the cell and sets the alignment closest to the center of the text. If the option is disabled, the alignment from the table style is used. If multiple text objects fall into one cell and are merged, the position is always set to the center of the cell.
Delete objects after table creating – all original lines and text objects will be deleted after the table is created.
Apply table style – apply to the created table the style selected from the drop-down list.
Cell boundary tolerance – this option defines the allowable extent to which lines may extend beyond cell boundaries. If a line’s extension does not exceed the specified value, such intersections are ignored, and cells that the line partially enters are not considered affected.
After choosing the settings and clicking the Continue button, you need to perform the following action:
Select objects for table: – select lines and text objects to create the table.


