Import from Excel

26892

Import from Excel

Attention! The plugin is purchased for the specified version of the Autodesk product!

To use the purchased license, use the Personal account of the ModPlus software installed on Your computer
Old price: 0.00 USD
12.00 USD
  • Excel data visualization and importing data from Excel file to the current Schedule

    Icon

    32x32px 16x16px dark 32x32px dark 16x16px

    Related news and articles


    Using

    The plugin includes two commands:

    Import from Excel

    32x32px 16x16px dark 32x32px dark 16x16px

    The main window of the plugin is divided into two parts. In the left part of the window, the list of imported Excel sheets in the current project is displayed. On the right side there are buttons for import management.

    1

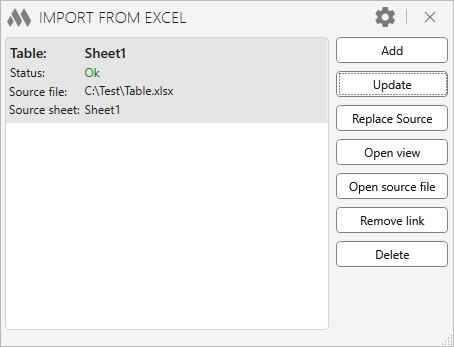
    Each item in the list of imported worksheets contains the following information:

    • Table – corresponds to the name of the view on which the table is drawn
    • View Type – type of view on which the table is drawn
    • Status – the status of the table. Possible values are: Ok, Table update required, The source file is missing, Source sheet is missing or renamed
    • Source file– the name of the Excel file from which the table was imported
    • Source sheet– the name of the sheet that was drawn
    • Consider the scale on the view – option that allows to take into account the scale of the view on which the table is drawn (available for drawing views and legends). If this option is disabled, the table will be redrawn in the view at a scale of 1:1.

    Import control buttons

    Add – opens a dialog box for adding a new table (see below).

    Update… – opens options for updating tables:

    • Update current table – redraws the table selected in the list.
    • Update all outdated tables – redraws all tables that require updating.

    Update all tables – redraws all tables in the list.

    Replace Source– replace the original Excel file and redraw the table.

    Open…Open source file from which the table was imported, or Open the folder with the source file.

    Open source file – open the Excel file from which the table was imported.

    Remove link– remove the selected table from the list, but the view on which the table is drawn remains (remove the link to the original Excel file).

    Delete – delete a view on which the table selected in the list is drawn.

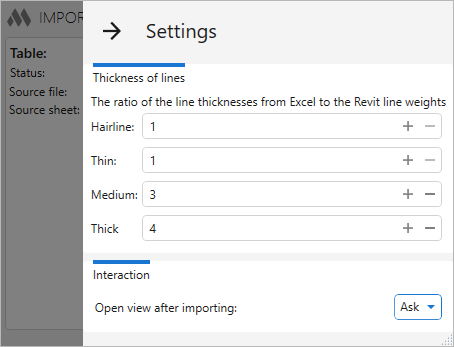
    In the upper right part of the window there is a button that opens the settings window:

    2

    Thickness of lines – a list of line thickness ratios from Excel with Revit line weights. Valid values are from 1 to 16.

    In the lower part of the window, you can choose one of the options for interaction with the drafting view after importing. The following actions are available: Ask, Open, or Do not open.

    Add new table

    4

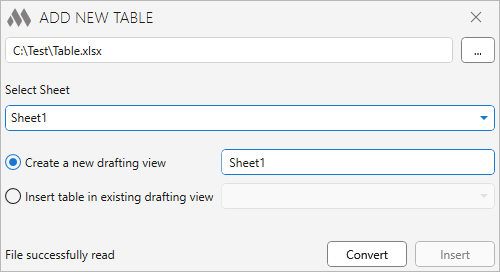
    In this window, you need to specify from which file and sheet to import the table and into which view it should be inserted (drawn).

    In the Import section, select the Excel file by clicking the corresponding button with three dots. After selecting the file, the list of sheets within it will be displayed below. Then, choose the required sheet from the list and specify the Import range: Used cells, Print area, or Custom range.

    In the Insertsection, choose whether to create a new view or insert the table into an existing one.

    If Create View is selected, you need to specify the view type and name in the fields below. For drafting views and legends, the Consider the scale of the view option is available. When enabled, you can define the scale for the new drafting view or legend.

    If the Insert table into existing view is selected, a dropdown list of available drafting views, legends, and Schedules will become active. When a drafting view or legend is selected, its scale is shown in the Scale field. If the Consider the scale of the view option is enabled, the current view scale will be preserved.

    When you import a table into an existing drafting view, all data in the view is deleted!

    Image processing is available from Revit version 2020 onwards.

    Table information is saved to the extended data of the view at the moment of import. After all required settings are configured, click the Insert button to start the import process. The selected sheet will be converted into intermediate data, a new view will be created if necessary, and the table will be drawn using Revit annotation elements.

    Tracking changes in real time

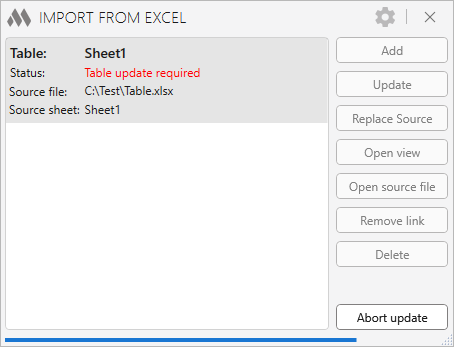
    At the moment when the main window of the plugin is openly monitoring changes to the source file in real time. As soon as the changes to the source file are saved, in the main window of the plugin for all items in the list referring to the source file, the status:
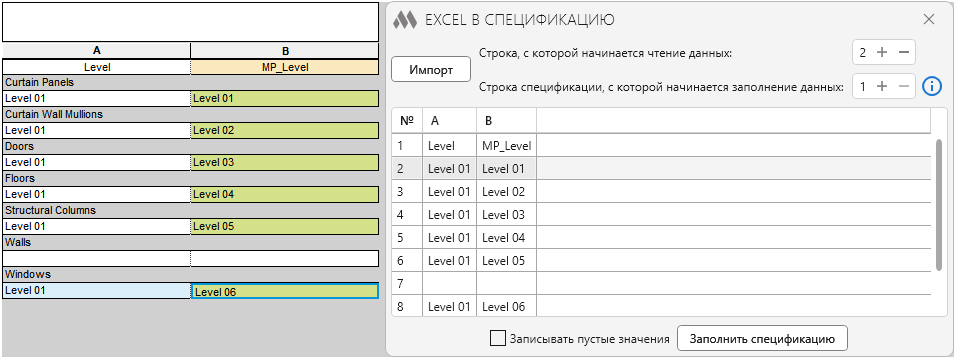
    3

    Excel to Schedule

    32x32px 16x16px dark 32x32px dark 16x16px

    5

    When the command is launched, a window opens where you need to click the Import button to select an Excel table.

    6

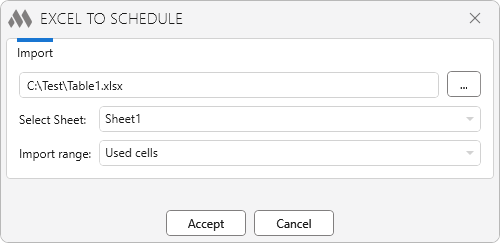
    In the opened window, select the Excel file by clicking the corresponding button with three dots. After selecting the file, the list of sheets it contains will appear below. Then, choose the required sheet from the list and specify the Import range: Used cells, Print area, or Custom range.

    7

    At the top of the plugin window, there are options for inserting the table into a schedule:

    The row from which to start reading data – specifies the row number in the plugin's table from which data will be read to fill in parameters in the schedule. The number updates when a row is selected in the table.

    The Schedule row from which data filling begins – defines the row number in the Revit Schedule (excluding the title and headers) where the data insertion begins. The count starts from 1 and refers to the rows containing parameter values.

    The main part of the plugin window displays the Excel data table that will be written into the schedule. Columns can be reordered by dragging them while holding the left mouse button.

    If the Write empty values option is enabled and there are empty cells in the plugin table, empty values will be written into the corresponding schedule cells: blank for text parameters and "0" for numeric ones.

    Clicking the Fill in Schedule button starts the process of filling ielement parameters with values from the table.

    The plugin fills the rows related to the model elements. Rows with intermediate totals are ignored. Therefore, to fill such Schedules correctly, you should use an Excel file with data without intermediate rows. For example:

    8

  • Change history for
    Year

    2025 Year

    Revit: Import from Excel 2.0.0.0 (03.07.2025)  Read more

    New
    Added a new command "Import to Schedule".
    New
    Added the ability to insert a table into a legend.
    New
    Added the ability to create pseudo-schedules.
    New
    Added the ability to specify a cell range for import.
    New
    Added the ability to consider view scale when importing into a drafting view or legend.
    New
    Added image processing.
    New
    Added the ability to open the folder with the source file.
    New
    Added the ability to batch update tables.
    New
    Added xlsm file processing.
    New
    Added support for composite text (superscript, subscript, bold, italic, underlined) when importing into a drafting view or legend.

    Revit: Import from Excel 1.7.2.0 (11.04.2025)

    Fix
    Fixed "Cannot access a disposed object" error occurring when rendering a table.

    Revit: Import from Excel 1.6.1.0 (20.02.2025)

    Improved
    Made minor improvements to the text width measurement method.

    2023 Year

    Revit: Import from Excel 1.6.0.0 (24.12.2023)

    New
    Prioritize using the cached value when retrieving a cell value.

    Revit: Import from Excel 1.5.9.0 (29.10.2023)

    Fix
    Added check for falling within the range of acceptable values of width and height of the created text.

    2022 Year

    Revit: Import from Excel 1.5.7.0 (18.12.2022)

    Improved
    Changed icons.
    Improved
    Added command access settings on the ribbon.
    Improved
    Added an option to choose an action after importing a table (to open or not to open the view) to the settings.

    Revit: Import from Excel 1.5.4.0 (10.08.2022)

    Improved
    Displaying cell read errors after the whole Excel worksheet has been processed.

    Revit: Import from Excel 1.5.3.0 (09.08.2022)

    Fix
    Fixed an error that occurs in some cases when reading cells with formulas.

    Revit: Import from Excel 1.5.2.0 (04.08.2022)

    Improved
    Improved algorithm for determining cell width.
    Fix
    Fixed an error reading the contents of some cells.

    Revit: Import from Excel 1.5.0.0 (21.07.2022)

    New
    Replacement of the main library for reading Excel files.
    New
    Added ability to delete a table without deleting the drafting view.

    Revit: Import from Excel 1.4.20.0 (21.02.2022)

    Improved
    Consideration of the screen scale when converting cell sizes.

    Revit: Import from Excel 1.4.19.0 (21.02.2022)

    Improved
    Consideration of the screen scale when converting cell sizes.

    2021 Year

    Revit: Import from Excel 1.4.18.0 (12.11.2021)

    Improved
    Correct display of plugin windows (on top of the Revit window, but not on top of other application windows).
    Fix
    Ignoring an error when failing to read the color of existing colors in the project.

    Revit: Import from Excel 1.4.16.0 (05.09.2021)

    Fix
    Removed the use of a static resource dictionary, which in some cases leads to errors when starting plugins.

    Revit: Import from Excel 1.4.14.0 (13.07.2021)

    New
    Added an option to change the source for an existing table.
    Improved
    Added saving of the last opened folder when selecting an Excel file..
    Fix
    Improved the accuracy of getting the width of the cells.
    Fix
    Fixed an error that occurs when adding new tables if the color of filled region type created when tables were previously added has a changed fill color.

    Revit: Import from Excel 1.3.11.0 (27.03.2021)

    Fix
    Added replacement of prohibited characters in the name of the drafting view being created.

    2020 Year

    Revit: Import from Excel 1.3.9.0 (06.06.2020)

    Fix
    Bug fix selection width in the localized value text buttons.

    2019 Year

    Revit: Import from Excel 1.3.8.0 (04.09.2019)

    Added capturing and displaying top-level errors.

    Revit: Import from Excel 1.3.7.0 (03.08.2019)

    Added processing of text rotated 90 degrees (only Revit 2019 and higher).

    Revit: Import from Excel 1.3.6.0 (01.07.2019)

    Fixed error when trying to create text cells that contain only whitespace.

    Revit: Import from Excel 1.3.5.0 (03.03.2019)

    Fixed bug with reading Excel file with number of sheets is less than three in the limited version of the function.

    2018 Year

    Revit: Import from Excel 1.3.4.0 (22.11.2018)

    Fixed a fatal error when reading data from a drafting view on computers with the optional designation of the time before noon and afternoon (AM/PM).

    Revit: Import from Excel 1.3.3.0 (21.11.2018)

    Added update view name when re-open function after rename a view in the project manager.
    Fixed error when deleting a table if open only one drafting view.

    Revit: Import from Excel 1.3.1.0 (29.10.2018)

    Fixed an error when searching for a suitable type of the TextNote.

    Revit: Import from Excel 1.2.0.0 (21.10.2018)

    Functions rebuilt to work with the format of Open Office Xml (xlsx).
    Removed the settings window. Settings moved to main function window.
    Added error handling when converting/building an excel sheet without interrupting the process of the function.
    Small bugs fixed.
    ModPlusStyle styling.

    Revit: Import from Excel 1.0.1.0 (20.06.2018)

    Fixed the cause of fatal completion of the work of Revit in case of error reading excel file.
  • Комментарии для сайта Cackle