


-
Isolation of selected elements in a 3D view with the ability to set the Section Box size
Icon


Related news and articles
Using
The plugin creates a 3D section box based on a single element or a group of elements selected in the current model or in a linked file.
When the plugin is launched, the following window opens:
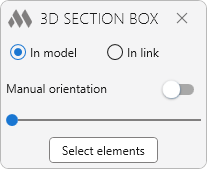
When the Manual orientation option is disabled, as well as when working with preselected elements, the 3D view boundaries are oriented automatically:
- if one element is selected, the orientation is performed based on that element,
- if a set of multiple elements is selected, the orientation is performed based on one of the elements in the set.
Clicking the Select elements button switches to the model to specify the elements for creating a 3D section box.
Select elements for 3D trimming – select elements in the model or in a linked file from any view.
When the Manual orientation option is enabled, after selecting the elements to be cropped, you will be prompted to select an element for orienting the 3D view.
Select an element to orient the view – select the element by which the 3D view boundaries will be oriented.
After completing the element selection, the plugin switches to or creates a 3D view named {3D-username}, where username is the name of the current Revit user, except when the plugin is launched from an existing 3D view.
3D view boundaries with a proportional offset relative to the selected elements will be created around them. When moving the slider in the plugin window, the 3D view boundaries change uniformly relative to the selected objects.
If the plugin is used again on the same 3D view, new 3D view boundaries will be created for the newly selected elements.
-
-
Change history forYear
2026 Year
Revit: 3D section box 2.1.0.0 (06.03.2026)
NewAdded support for processing elements with an active schedule view.Revit: 3D section box 2.0.0.0 (14.01.2026) Read more
NewAdded an option to select elements from links.NewThe plugin button is duplicated on the standard "View" panel of the "Modify" tab.NewAutomatic orientation according to the direction of the selected element(s).NewAdded the "Manual Orientation" mode.2023 Year
Revit: 3D section box 1.2.4.0 (14.01.2023)
ImprovedChanged icons.ImprovedAdded command access settings on the ribbon.2020 Year
Revit: 3D section box 1.2.2.0 (05.11.2020)
ImprovedService update.2019 Year
Revit: 3D section box 1.2.1.0 (03.03.2019)
Reduced minimum distance of crop box.2018 Year
Revit: 3D section box 1.2.0.0 (19.10.2018)
ModPlusStyle styling.2017 Year
Revit: 3D section box 1.0.1.0 (02.12.2017)
When processing selected or selected items, the processing of 3D view borders is excluded. -