Launch options
- ModPlus floating menu or palette
- AutoCAD ribbon
- Command line: _mpSlope
Icon
Related news and articles
Using
The plugin is designed to create conventional slope symbols and allows you to configure the hatch type, its parameters, and appearance.
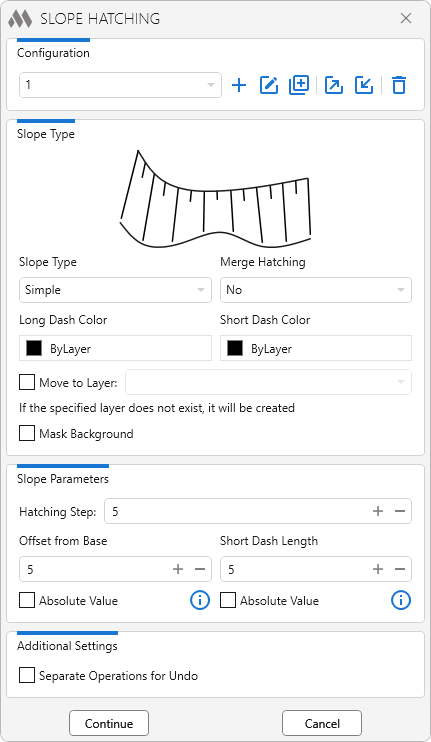
To start working with the plugin, create a configuration by clicking  . Created configurations can be duplicated
  , renamed
  , exported
  , imported
  , and deleted
  using the corresponding buttons.
The upper part of the group displays a preview of the hatching according to the selected settings.
Slope Type – determines the slope hatching pattern. The following options are available:
- Simple
- Break
- Excavation
- Reinforced
- Retaining wall
Merge Hatching – determines how the created hatching elements are combined:
- No – hatching elements are created separately
- Group – the created hatching elements are combined into a group
Long Dash Color – specifies the color of the main strokes
Short Dash Color – specifies the color of the short strokes
Move to Layer – allows you to place the created hatching on the specified layer. If the specified layer does not exist, it will be created
Mask Background – enables masking of objects located behind the created hatching
Hatching Step – specifies the distance between strokes
Offset from Base – specifies the offset of the main strokes from the slope toe
Short Dash Length – specifies the length of the short strokes
For the Offset from Base and Short Dash Length parameters, the Absolute Value option can be enabled. When enabled, the value is specified in drawing units; when disabled, it is specified as a percentage of the length of the main strokes.
Separate Operations for Undo – separates the creation of hatching into individual operations that can be undone sequentially using the standard AutoCAD Undo command.
After configuring the parameters, click Continue. Then specify the slope geometry in the drawing step by step.
Select slope crest [Entire/Settings]: – select a line, polyline, or part of it corresponding to the slope crest. The following options are available:
- Entire – use the entire selected object
- Part – use only part of the selected object
- Settings – return to the plugin settings window
Select slope toe [Entire/Settings]: – select a line, polyline, or part of it corresponding to the slope toe. The Entire, Part, and Settings options are also available.
When the Part option is selected, you must additionally specify the boundaries of the section to be used:
Select first point: – specifies the start of the section.
Select second point: – specifies the end of the section.
After selecting the slope crest and toe, the plugin creates the slope hatching. If necessary, its position can be adjusted manually:
Select first line of editing range [Point]: – specifies the first boundary of the hatching section to be adjusted.
Select second line of editing range [Point]: – specifies the second boundary of the hatching section to be adjusted.
Select line for centering: – select the hatching line that needs to be manually moved to the required position.
Select new point: – specifies the new position of the selected stroke. The remaining strokes within the specified range will be redistributed according to the new position.
The adjustment step can be skipped by pressing Enter after selecting the slope toe.
Swap crest and toe? [No/Yes]: – allows you to swap the selected slope crest and toe.
After the hatching is created, the plugin continues to run cyclically and prompts you to select the geometry of the next slope. Press Esc to exit.


