Icon
Related news and articles
Using
The plugin includes three commands:
Room finishing
To get started with the plugin, you must create a room trim configuration by clicking  . Created configurations can be duplicated
  , renamed
  , exported
  , imported
  and removed
  using the corresponding buttons.
On this tab, rules for the automatic creation of finish elements for project rooms are configured.
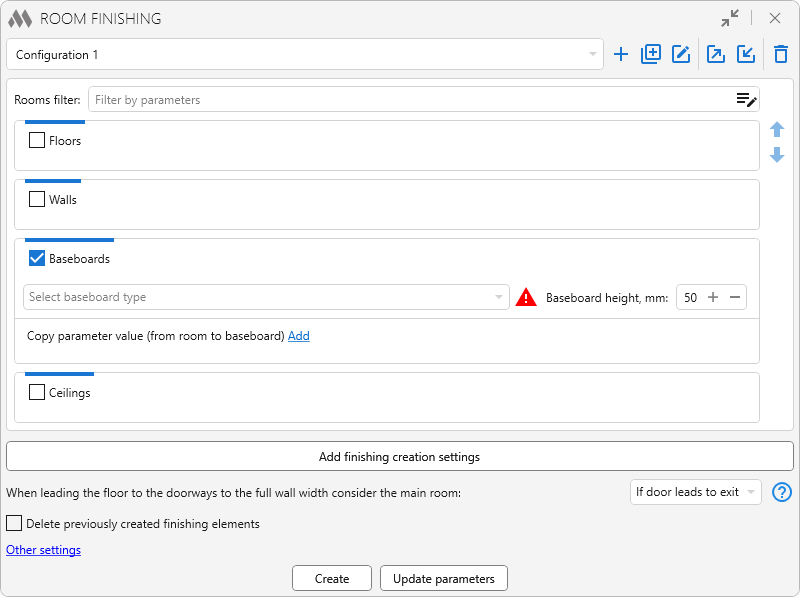
Next, you must click Add finishing creation setting to add a block of room finishing settings. Each block consists of the elements filter by parameters of rooms and individual settings for creating:
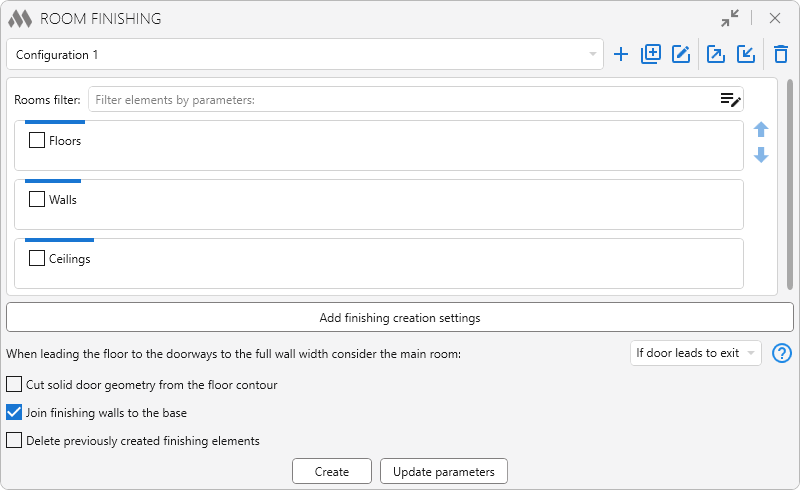
When multiple room finishing options are specified, the corresponding settings blocks can be reordered in the list using the buttons 
 .
.
Delete previously created finishing elements option applies to all finishing elements of the current configuration and allows automatically deleting previously created elements before creating new ones.
The option Measure bottom offset: From level/From room bottom allows selecting the reference from which the bottom offset of all finishing elements will be calculated.
When creating finishing, if previously created floors and ceilings match the newly created ones, their contours are updated without creating new elements.
When you click Create, the following finishing generation options are available:
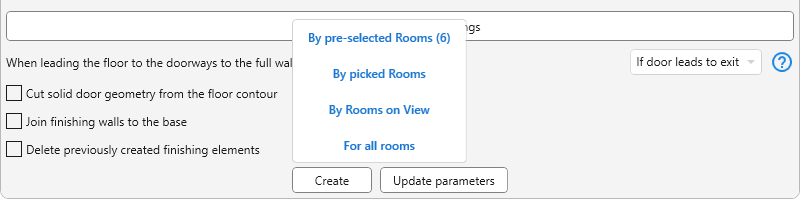
The By pre-selected Rooms option applies the specified finishing settings to rooms that were selected in the model before launching the plugin.
The By selected Rooms option allows you to select rooms directly in the model. After selection is complete, click “Done” to start creation.
The By Rooms on View option applies the selected settings to all rooms displayed in the active view. Finishing is created along the contours of all rooms present on the plan.
The By all rooms option applies the selected settings to all rooms in the project. Finishing is created along the contours of all rooms in the project.
The Update parameters button allows you to copy parameter values from rooms to the specified parameters of previously created finishing elements.
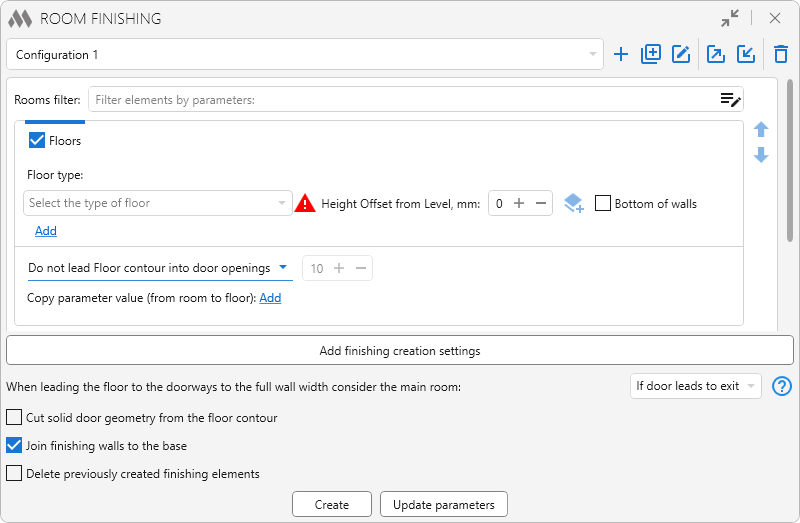
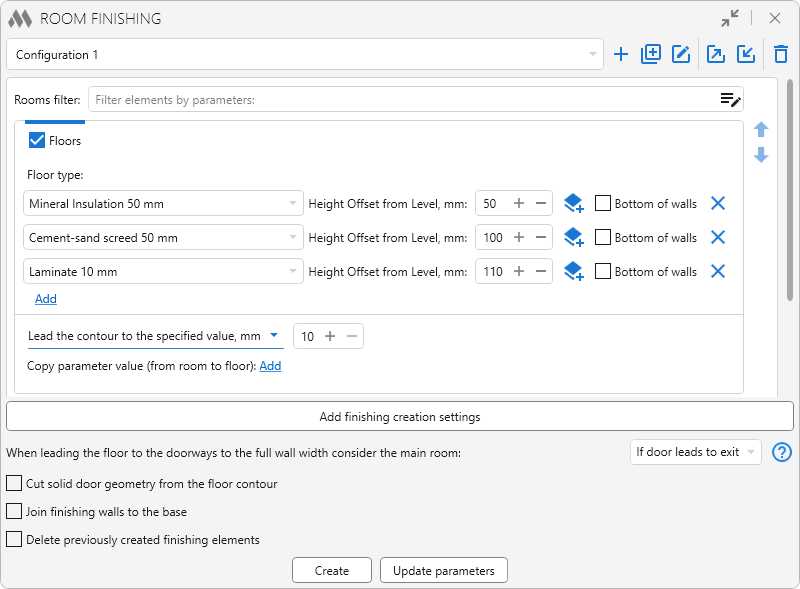
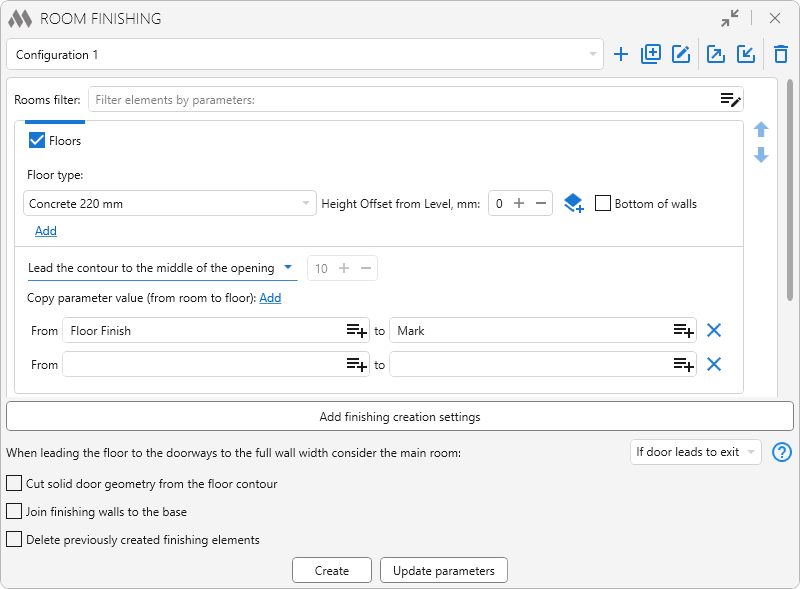
To create floor by room, you need to check the corresponding box in the room finishing settings block and fill in the necessary settings.
The warning indicator .png) indicates that the floor type is not specified or is missing in the current project. In this case, floors will not be created.
indicates that the floor type is not specified or is missing in the current project. In this case, floors will not be created.
Next, select the floor type from the drop-down list containing all floor types of the current project.
Height Offset from Level/ Offset from Room bottom allows shifting the floor relative to the level or the bottom of the room depending on the selected settings. The value can be either positive or negative.
The button  allows setting in the field the thickness value of the selected floor type with "+" sign.
The Bottom of walls option allows you to extend the selected floor under finish walls when creating walls and floors at the same time. When using a multilayer floor, the checkbox can be enabled for only one layer—however, all layers located below the selected one will also be extended under the finish walls. When this option is enabled, the value of the Bottom, mm parameter for finish walls is automatically set equal to the Height Offset from Level/ Offset from Room bottom; this value cannot be edited.
With the Add button you can create a multilayer floor pie by adding multiple floor types:
This configuration results in a floor that consists of several layers. Each layer is an individual element. If the height offset is correctly specified, the floor will be built above the floor slab.
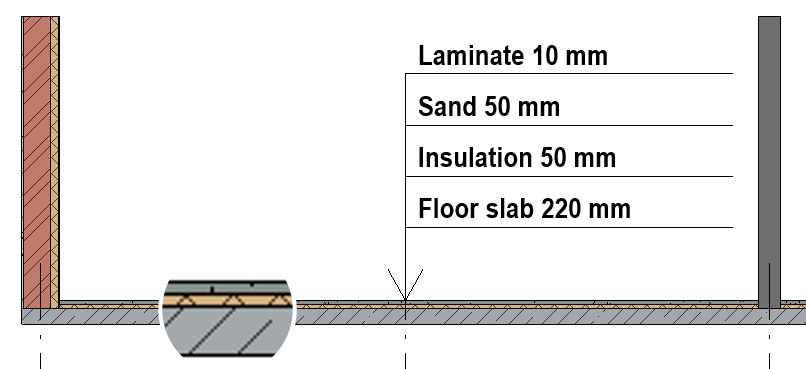
When creating a multilayer floor, for each layer you must specify an offset from level equal to the sum of the thicknesses of all previous layers, as well as the thickness of the current layer, since the layer thickness is applied downward.
To place the floor below the level, set a negative offset value.
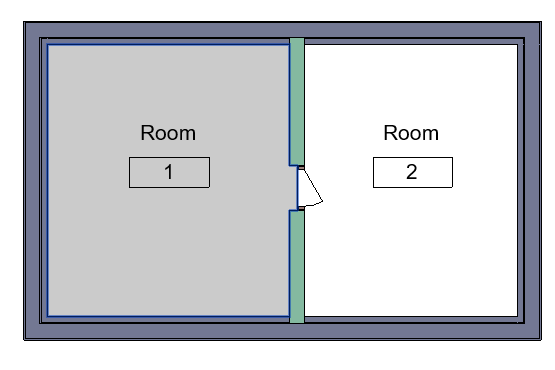
The next setting allows you to determine how the floor boundary is extended into door openings. The drop-down list provides the following options:
- Do not extend the floor boundary into door openings
- Extend the boundary to the middle of the opening
- Extend the boundary through the full thickness of the opening
- Extend the boundary by the specified value, mm.
- Extend the boundary to the middle of the door leaf
Below is the Copy parameter value (from room to floor) option. Clicking the button again adds new fields and allows copying values of multiple parameters at the same time:
At the bottom of the plugin window there are options applied to all floors created within the current configuration.

When leading the floor to the doorways to the full wall width consider the main room: If door leads to exit/If door leads to entrance – allows you to specify which of the two connecting rooms will be the main (exiting or entering) and the floor in the doorway will be created only for this room. This option works even if only one of the adjacent rooms is selected.
Process floor-level windows – when enabled, the floor is extended into openings made by elements of the “Windows” category, through the full thickness of the opening. When disabled, such openings are processed according to the general rules.
Cut door solid geometry out of the floor boundary – when enabled, the solid geometry of doors is cut out of the floor boundary when it is created:
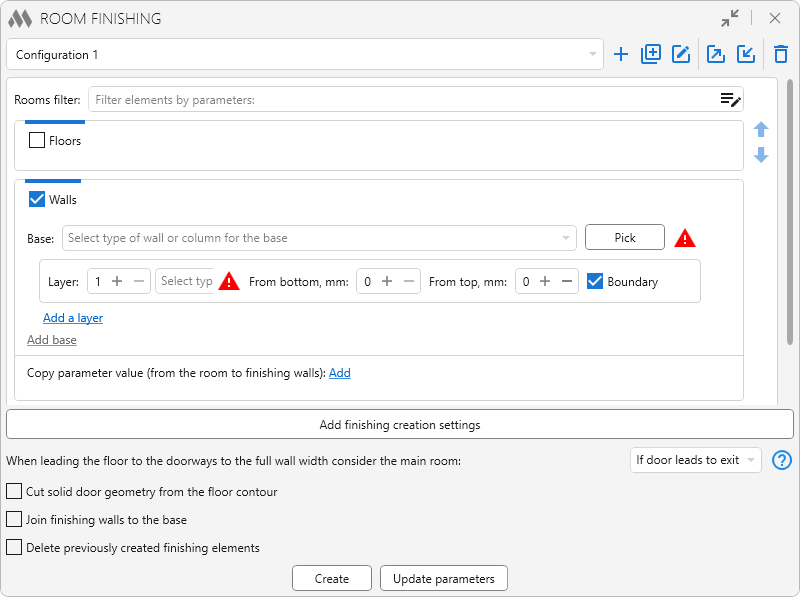
To create a finishing wall, you need to check the corresponding box in the room finishing settings block and fill in the necessary settings.
The warning indicator indicates that the base type or the finish wall type is not specified or is missing in the current project. In this case, walls will not be created.
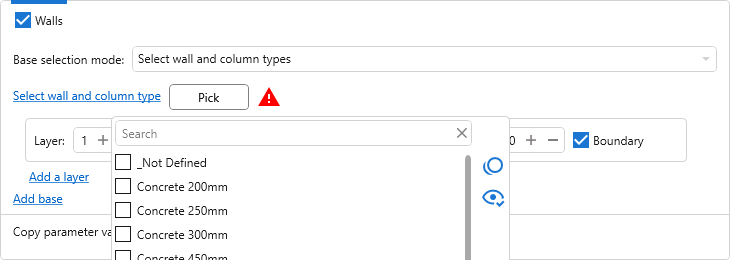
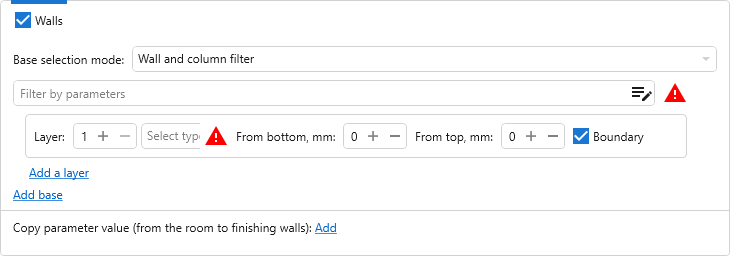
The plugin provides three modes for selecting the base for creating finish walls:
- For all wall and column types – in this mode, finish walls will be created for all walls and columns of the room without additional filtering.
- Select wall and column types – allows you to specify one or more wall and/or column types of the current project to be used as the base for creating finish walls. Types are selected from the drop-down list or directly in the model using the Select button.
3. Wall and column filter – in this mode, the wall and column types used as the base are determined using an element filter based on wall and column type parameters.
The plugin provides the ability to create finish walls using base walls and columns from linked files. If elements from a linked file are used as the base, cutting openings in finish walls is available starting with Revit 2022.
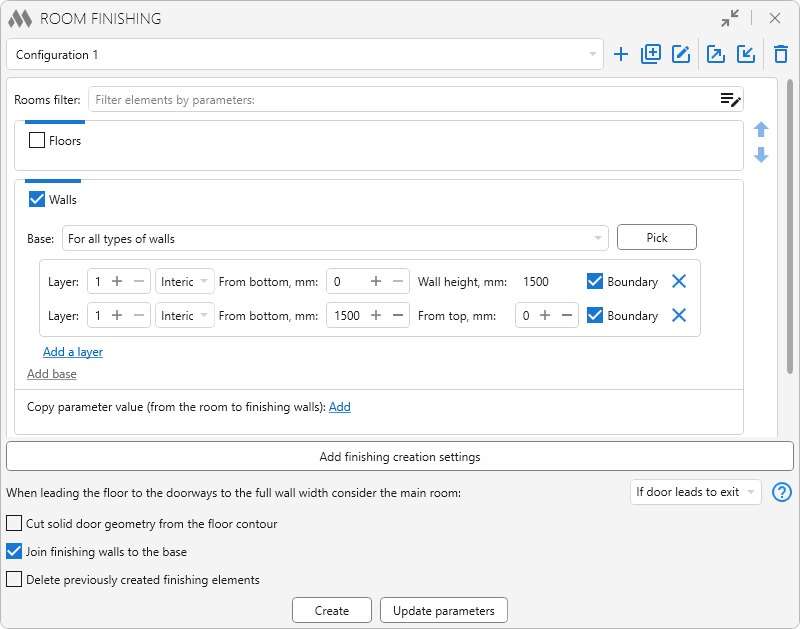
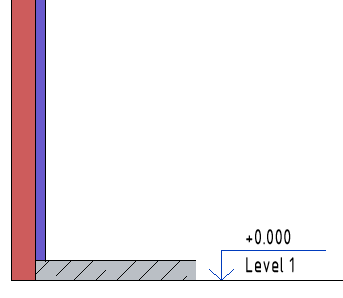
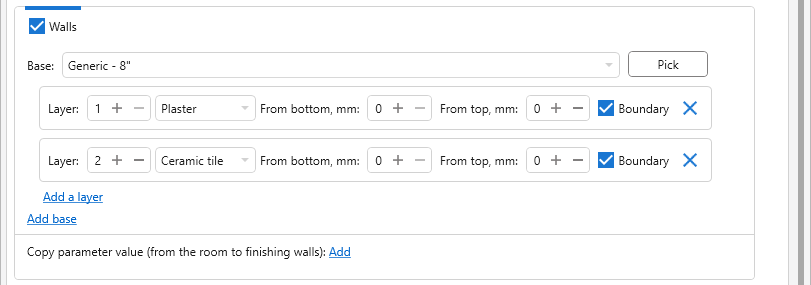
For each selected base, the parameters of the finish walls being created are configured. Finish walls can be multilayer and height-composite.
The Layer option determines the order of the finish walls relative to the base. The finish wall type is selected from the drop-down list of all wall types of the current project.
The Bottom, mm option sets the offset of the lower edge of the finish wall by the specified distance from the level or the bottom of the room depending on the selected settings. The value can be positive or negative. When the Bottom of walls option is enabled for the floor, the Bottom, mm value is automatically set equal to the floor Height Offset from Level; this value cannot be edited.
The Top, mm option sets the offset of the upper edge of the finish wall by the specified distance from the top boundary of the room. The value can be positive or negative.
The Boundaries option allows you to create finish walls with the Room Bounding property enabled.
Using the Add layer button, you can add additional finish wall layers.
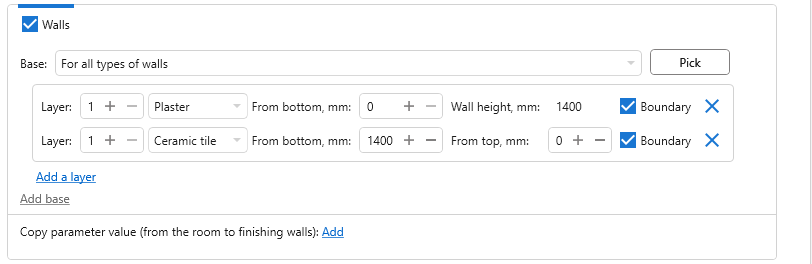
To create height-composite finish walls, you must specify the same layer number for two or more finish wall layers. The position of the lower boundary of each part of the composite wall is defined using the From bottom, mm option, while the height and position of the upper boundaries are calculated automatically.
The Add base button allows you to configure finish wall creation for another base type within a single room finishing settings block.
If the base walls are located in linked files, cutting openings in finishing walls is supported starting from Revit 2022.
Below is the Copy parameter value (from room to finish walls) option. Clicking the button again adds new fields and allows copying values of multiple parameters at the same time.
At the bottom of the plugin window there are options that apply to all finish walls created within the current configuration:
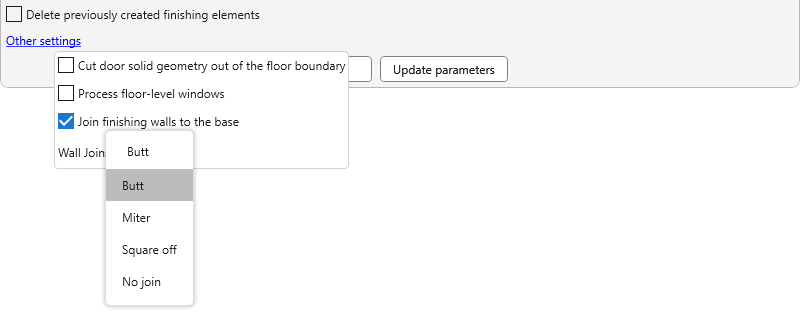
- Join finish walls to base
- Wall joins – allows selecting the type of connection for the finish walls being created: Butt, Miter, Square off, No join.
Baseboards are created as elements of the “Walls” category.
To create baseboards by rooms, you need to enable the corresponding checkbox in the finishing settings block and set the required parameters.
The warning indicator indicates that the baseboard type is not specified or is missing in the current project. In this case, baseboards will not be created.
Next, select the baseboard type from the drop-down list containing all wall types of the current project.
The Baseboard height option defines the height of the created baseboard relative to the floor level, and if there is no underlying slab – relative to the level of the story or the bottom of the room depending on the selected settings.
Below is the Copy parameter value (from room to baseboard) option. Clicking the button again adds new fields and allows copying values of multiple parameters at the same time.
Creating ceilings is available for 2022 Revit version and above.
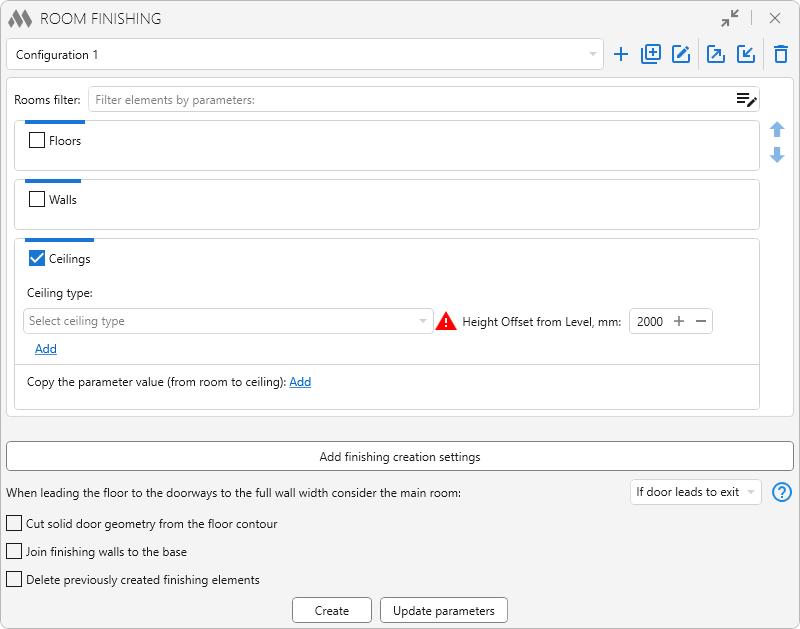
To create ceilings by rooms, you need to enable the corresponding checkbox in the finishing settings block and set the required parameters.
The warning indicator indicates that the ceiling type is not specified or is missing in the current project. In this case, ceilings will not be created.
Next, select the ceiling type from the drop-down list containing all ceiling types of the current project.
Height Offset from Level/ Offset from Room bottom allows setting the ceiling position relative to the level or the bottom of the room depending on the selected settings. The value can be either positive or negative.
Using the Add button, you can create a multilayer ceiling by adding several types.
Below is the Copy parameter value (from room to ceiling) option. Clicking the button again adds new fields and allows copying values of multiple parameters at the same time.
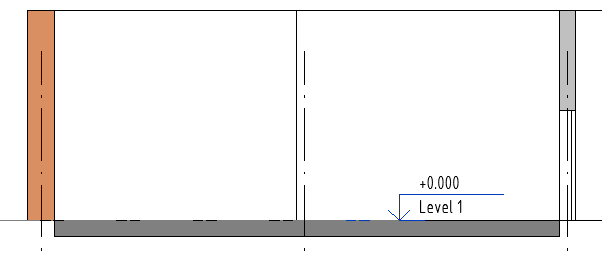
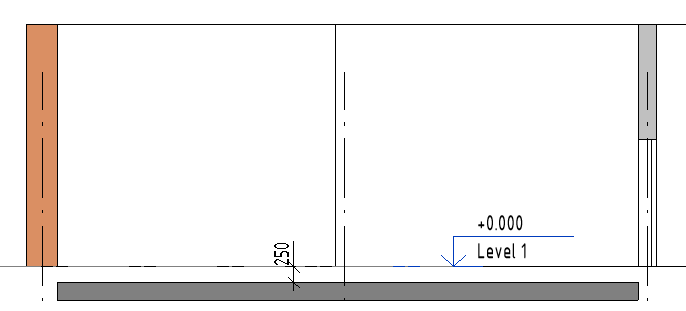
1. Floor offset from level options
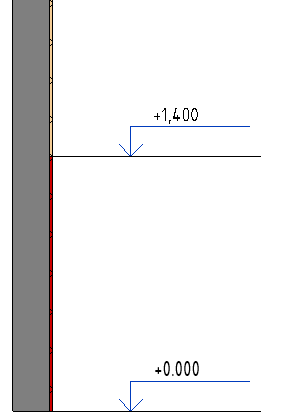
Floor offset from level is set to 0 mm:
Floor offset from level is set to -250 mm:

2. Creating floors with different settings using two adjacent rooms as an example:
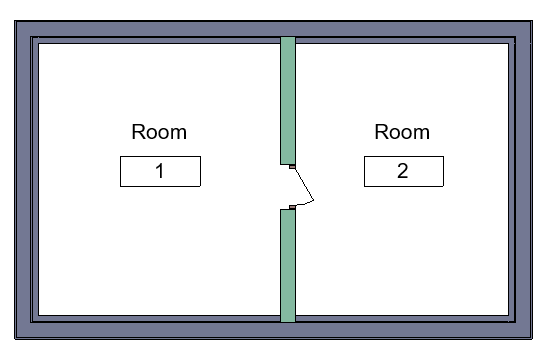
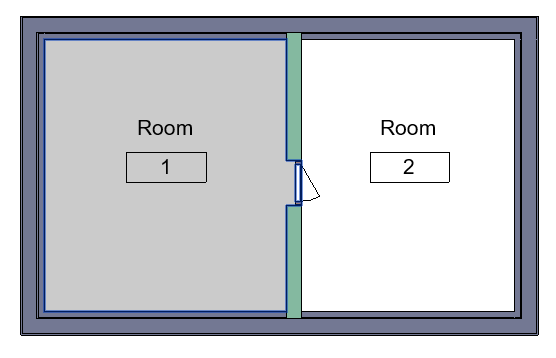
If you select Do not extend the floor boundary into door openings, the floor is created strictly along the room contour, so door openings in the room will remain unfilled:

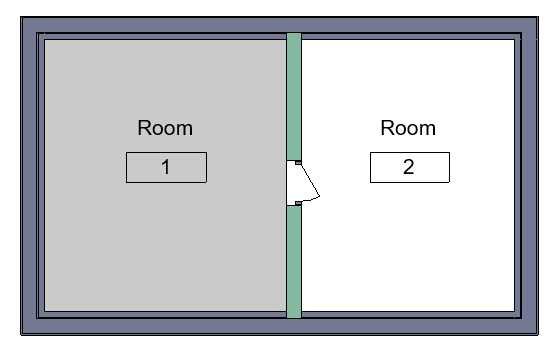
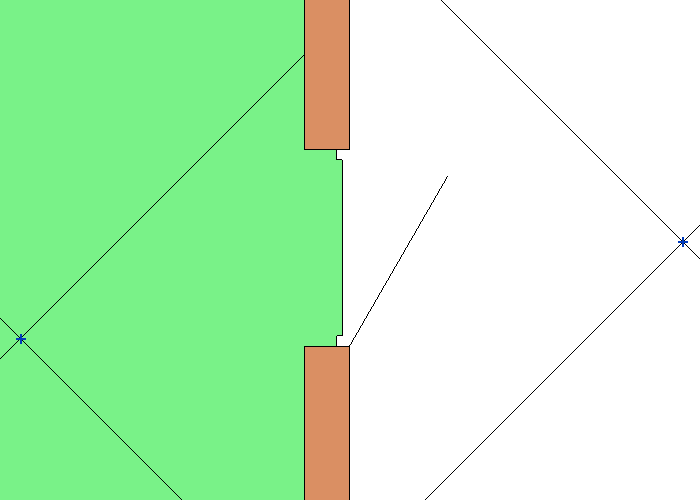
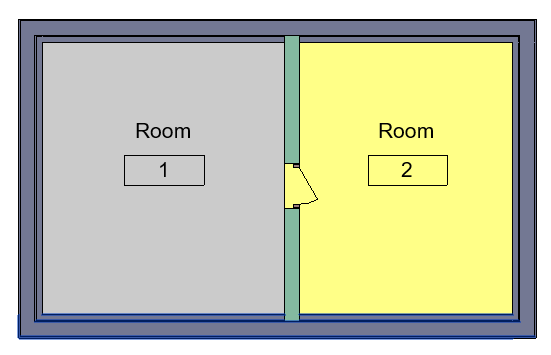
If you select Extend the boundary to the middle of the opening, then during creation the floor will be extended to the middle of the wall in door openings:
If you select Extend the boundary through the full thickness of the opening and enable Cut door solid geometry out of the floor boundary, the floor will be extended into door openings through the full wall thickness, and the solid geometry of doors will be cut out of the floor boundary:
If you take adjacent rooms that share a common door opening and in the When extending the floor into door openings through the full wall thickness, consider this room as the main one option select If the door is an entrance, then the floor in the door opening will belong to the room into which the door opens:
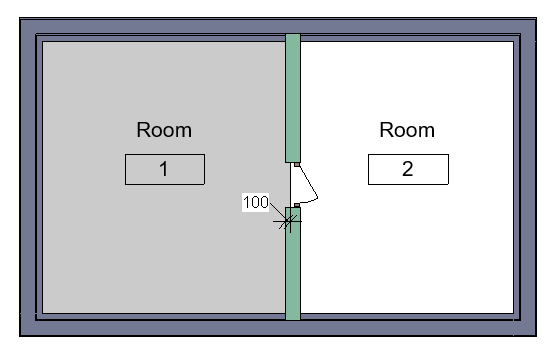
If you select Extend the boundary by the specified value, you can specify how far the floor will be extended into the door opening:

3. Creating finish walls and floors with the “Wall bottom” floor option enabled

4. Creating multilayer finish walls:
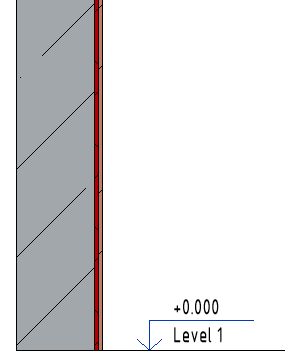
5. Creating height-composite finish walls:
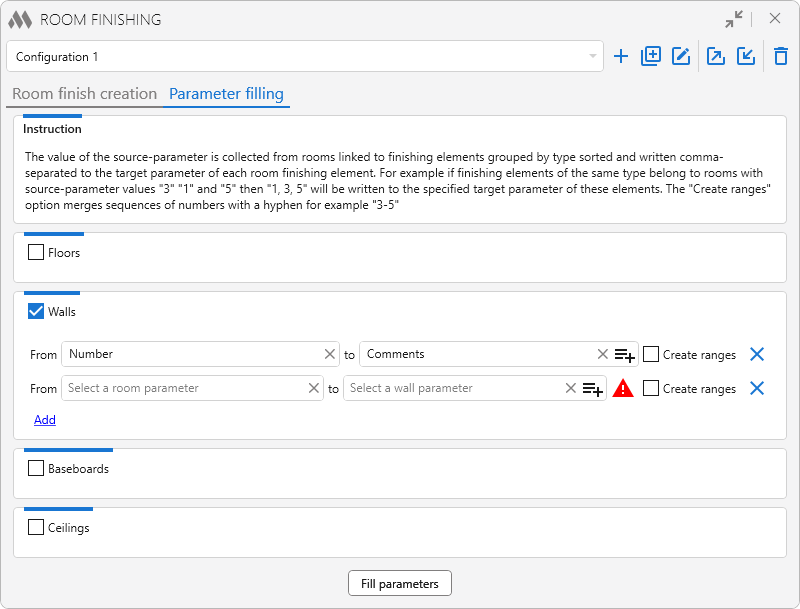
The tab is intended for batch transfer of parameter values from multiple rooms to their associated finishing elements. Unlike parameter filling on the Room Finishing Creation tab, where a room parameter value is copied directly into the finishing element of the same room, on this tab values are collected from all rooms associated with elements of the same type. The resulting values are sorted and written into the specified parameter, separated by commas.
This is useful, for example, for creating a consolidated list of room numbers in a schedule: a single finishing element type can be used in multiple rooms, and all their values will be automatically collected into the element parameter.
Parameter filling rules are defined separately for each type of finishing elements: Floors, Walls, Baseboards and Ceilings. To enable filling for a required type, select the checkbox next to its name.
For each enabled type, one or more parameter filling rules are defined. Each rule includes:
-
From – the room parameter whose value will be read
-
To – the instance parameter of the finishing element where the resulting value will be written
-
Create ranges – an option that allows combining sequential numeric values into ranges.
You can define multiple filling rules by clicking Add.
After configuring the rules, use the Fill parameters button to collect and write parameter values for finishing elements From preselected rooms, From selected rooms, From rooms in the view or From all rooms.
Update Room finishing
The command is available in Revit 2022 and later versions.
The command allows you to update the last created finishing in the selected rooms without opening the main plugin window.
Using the command, you can:
- update the contours of previously created floors and ceilings
- recreate previously created walls and baseboards, including deleted ones.
Manage Room finishing
The command is intended for managing relationships between finishing elements and rooms.
The relationship between finishing elements and a room is established automatically when finishing is created using the Room finishing command. The presence of this relationship allows the plugin to determine which room a finishing element belongs to and to use this information in further operations, for example when filling parameters or selecting finishing elements.
The Manage Room finishing command is used to manually manage these relationships in non-standard situations—for example, when finishing elements are created manually or when it is necessary to reassign an element to another room.
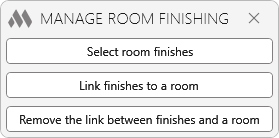
The following actions are available in the command window:
- Select room finishing – allows selecting in the model the finishing elements associated with the selected room.
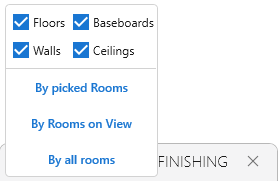
After starting the command, you can specify which types of finishing elements should be considered: floors, walls, baseboards and ceilings. You also need to select the search scope: From preselected rooms, From selected rooms, From rooms in the view or From all rooms.
- Link finishing to room – creates a relationship between selected finishing elements and a room. After starting the command, you need to first select a room, then the finishing elements to be linked to it.
After the relationship is created, the finishing elements will be considered as belonging to the selected room. This is required for correct operation of plugin functions, for example when filling parameters of finishing elements based on room data.
- Remove link between finishing and room – removes the existing relationship between finishing elements and a room. After starting the command, you need to first select a room, then the finishing elements for which the relationship should be removed.
After removing the relationship, the finishing elements will no longer be considered as belonging to this room and will not participate in plugin operations associated with this room.


