Export (print) selected sheets to PDF, DWG, etc. with automatic sheet format detection
Icon
Related news and articles
Using
Depending on the Revit version, the plugin can export to PDF in the following ways (selectable in the plugin settings):
- In Revit 2019 and later, export is carried out through printing using a selected printer (a list of available printers is provided at the end of this guide) and requires the use of some additional options (printer selection, PDF file compression, custom print formats).
- In Revit 2022 and later, direct PDF export is supported without the need for a printer or additional settings.
Plugin window consists of 4 main areas: sheet reading settings area, sheet selection tables for files, export settings bar and status bar:
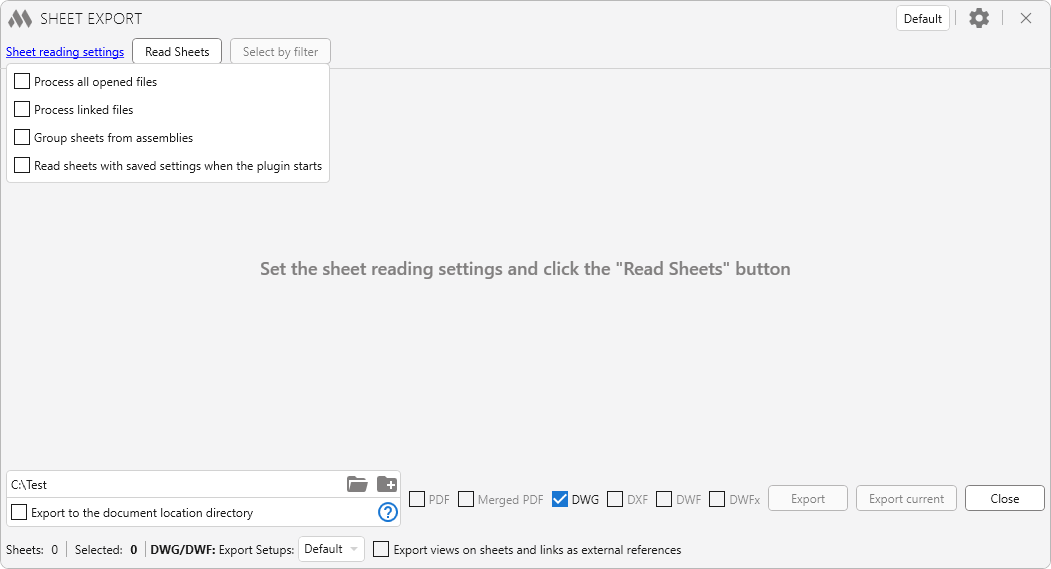
The sheet reading settings are opened in a separate dialog and saved in subsequent runs of the plugin.
The plugin can process all open files, as well as non-unloaded linked files. If several files are open at the moment the plugin starts, the Process all opened files option becomes available; when it is enabled, a separate tab will be created for each project in the plugin window. The Process linked files option works the same way.
If the Group sheets from assemblies option is enabled, sheets placed in assemblies will be grouped separately from other sheets.
When the Read Sheets button is pressed, the process of collecting sheets and determining the sizes of their title blocks based on the system parameters "Sheet Width" and "Sheet Height" is initiated. For print to PDF, the plugin additionally performs automatic detection of print formats (size in printer) according to the size of the Title Block and initializes the PDF printer. You can also use this button if you want to re-read the sheets. Automatic reading of sheets at plugin startup is enabled with the option Read sheets with saved settings when the plugin starts.
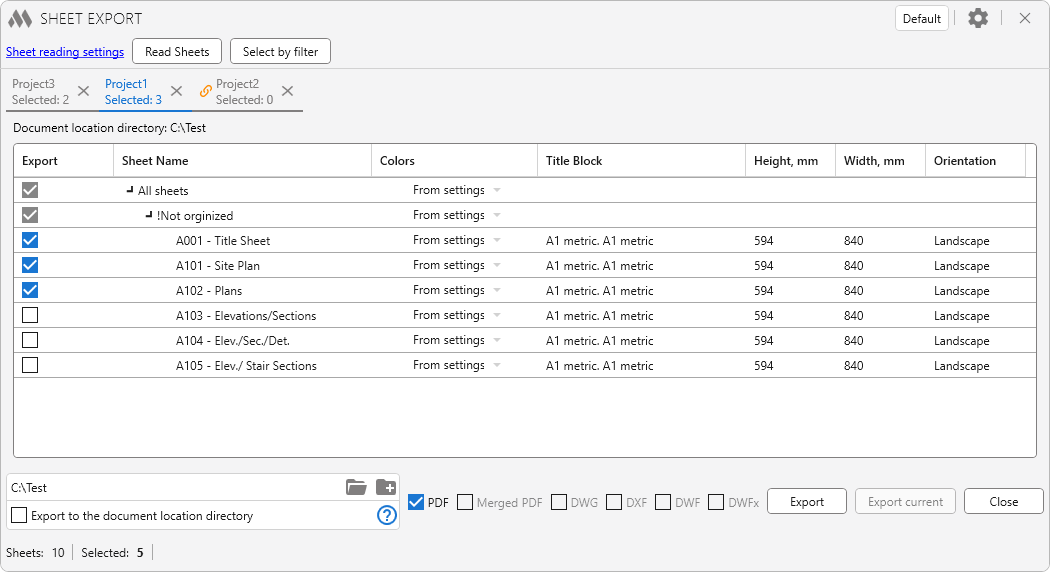
If multiple documents are displayed in the plugin, the number of selected sheets is indicated in the header of each document, and a button to remove the document from the list of processed documents is available.
If sheets were selected in the Project Browser when the plugin was started, then when the plugin reads the sheets, it will check those sheets in the table. The active sheet in the list will be bolded.
If the sheet print format will be matched to the nearest print format, or the sheet print format will not be matched, the corresponding notification will be displayed in the first column.
If there is more than one Title Block on the sheet (composite sheet), the sheet will be divided into several sheets in the sheet table, with a suffix added through a slash. For print to PDF, the table will display the print format that is matched to the Title Block.
Important: If there are several Title Blocks on one sheet, or any other graphics outside the boundaries of the Title Block, the total size of the describing rectangle must have the size allowed for printing. For example, if the sheet has two Title Blocks in A4 format, then the print size of this sheet will be A3. The maximum allowable size is A0x3 1189 mm x 2523 mm or 2523 mm x 1189 mm.
The default printing color settings are specified in the plugin settings window (see below). To change these settings for individual projects, groups of sheets or sheets, drop-down lists are available in the Colors column.
To quickly select multiple sheets in a table, select the necessary sheets (with Ctrl or Shift) and check any of the selected sheets.
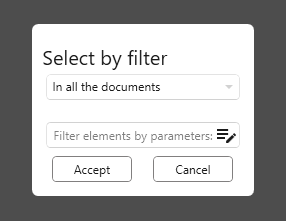
The Select by filter button allows using the filter by parameters of sheet to check the required sheets both in the current and in all documents:
When you right-click in the table area, a window appears with the following available actions:
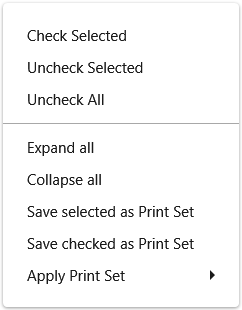
A Print Set is a combination of several selected sheets that is saved and can be applied in subsequent runs of the plugin. A Print Set is created for each project separately.
The export setup bar contains the path to the export directory, checkboxes to select the export format, a button to start the export, and a button to close the plugin. Export current button allows you to export the current sheet of the current document to PDF without reading all sheets and selecting it in the table.
The Merged PDF format allows you to merge exported pdf files into one. It is not necessary to check the checkbox PDF.
Important: The merge is performed for the exported pdf files within the same folder.
The status bar contains information about the number of sheets in the current document, the number of sheets selected for export, the number of sheets whose format is undefined, the number of sheets whose format is fitted, and the name of the PDF printer.
At the top right of the window is a slide-out tab with settings .png) :
:
You can save the settings you have made in the configuration. The name of the current configuration is displayed on the right side of the main plugin window. The following tools are available for working with configurations:
 – creating a new configuration.
 – duplicate current configuration.
 – rename current configuration.
 ,
,  – export and import configuration, respectively.
 – deleting current configuration.
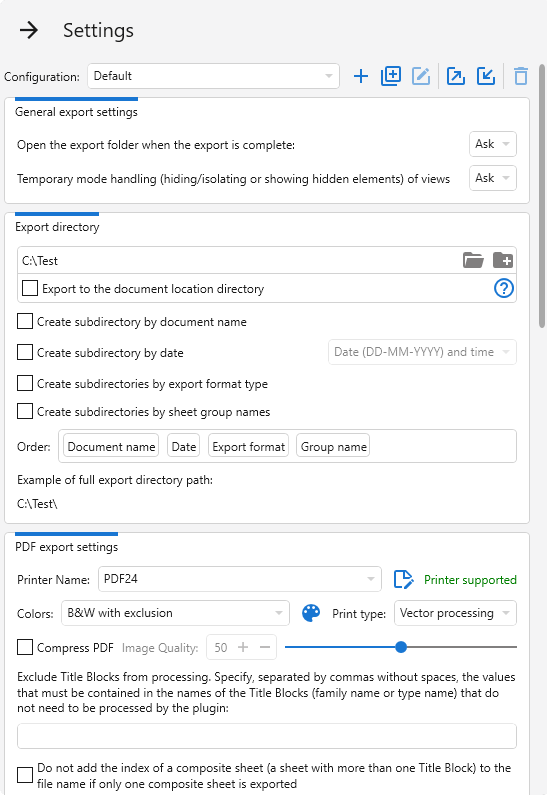
Open the export folder when the export is complete option allows you to select an action option after the export is complete: Open folder, Do not open folder, or Ask.
If there are views with a temporary mode on the printed sheet, you can use Temporary mode handling (hiding/isolating or showing hidden elements) of views option to select the plugin operation: Disable mode, Leave mode, or Ask.
– the path to the folder where sheets will be exported. This option is also available in the export settings line. It is not recommended to use network folders as the save directory, as network paths may have restrictions on file name length.
The Export to the document location directory option allows exporting sheets to the location directory of the current document. If the document does not have a location directory defined, the export will be done to the specified Export directory. If the specified Export directory does not exist, the export will be skipped.
Also in this group are the options to create subfolders by document name, by date, by export format type, and by sheet group name. If you choose to create a folder by date, a drop-down list of formatting options for the folder name becomes available.
The Order in which folders are created can be set by moving the panels with the names of the subfolder creation options. An example of a complete path to save a directory is shown below, taking into account the current settings.
If the group name contains only invalid characters (e.g., "???") and the option to create a folder by group name is enabled, the folder name will be “Incorrect group name”.
If the option to create folders by sheet group name is enabled, the group names will be added to the name of the merged pdf file when exporting to the merged PDF.
contain the following options:
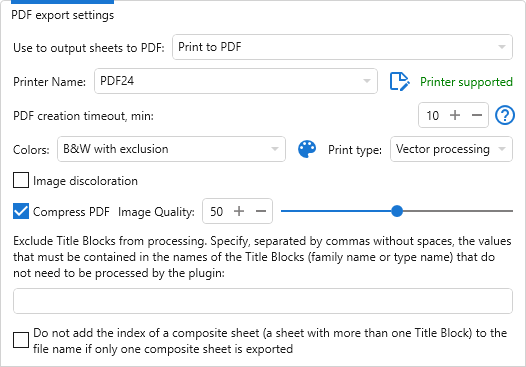
Use to output sheets to PDF: (for Revit versions 2022 and higher) – selecting how to export to PDF: Print to PDF or Export to PDF.
Printer Name (for print to PDF) – drop-down list of installed printers, where you must select the printer to export (print) to PDF.
Errors may occur while configuring the printer. In this case, it is recommended that you restart Revit and restart the plugin.
To the right of the printers list displays a message about the support status of the selected printer and a button that opens the dialog box for creating custom formats  :
:
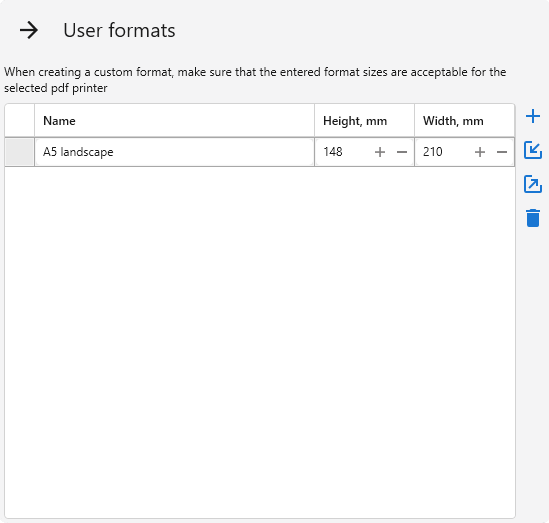
Using the buttons on the right side of the window, you can add a new user format , import or export user formats from xml file, and delete the selected user format  .
.
When creating an user format, make sure that the entered format sizes are acceptable for the selected pdf printer.
PDF creation timeout, min – this parameter sets the timeout for the PDF file to appear after executing Revit’s standard "Print" or "Export" commands, as the file itself may be created with a slight delay. If for any reason the file does not appear, the plugin stops waiting after the specified time.
Colors – one of the three export options:
- Color: All colors in the project are maintained and printed, provided the printer supports colors.
- Black Lines: All text, non-white lines, pattern lines, and edges print in black. All raster images and solid patterns print in grayscale.
- Grayscale: All colors, text, images, and lines are printed in grayscale.
- B&W with exclusion: printing is performed with the color option, and then converting the pdf file to black-and-white (monochrome) format, excluding certain colors from processing. This method makes it possible, for example, to print monochrome drawings with color signatures in the Title Block. To edit the excluded colors, click the
 button:
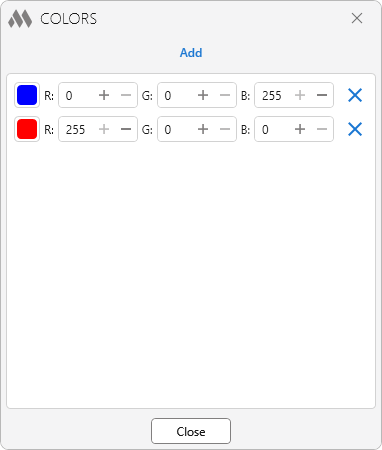
- Grayscale with exclusion : All colors, text, images, and lines are printed in grayscale, excluding the specified colors .
Print type – vector or raster processing. Read more.
Сompress PDF (for print to PDF) – allows to reduce PDF files size in cases when there are pictures on sheets or export with bitmap processing.
Image discoloration – allows to enable or disable image discoloration when printing with color exclusion.
To Exclude Title Blocks from processing (for example, if there are Title Blocks on the sheet that are located entirely inside the boundaries of other Title Blocks), you must enter in the appropriate field, separated by commas without spaces, the values that are contained in the names of the Title Blocks (family name or type name) that do not need to be processed by the plugin.
For composite sheets, you can disable adding a suffix in the file name when only one composite sheet is exported by using the corresponding option.
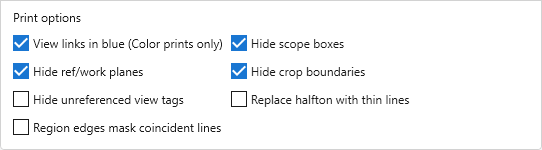
Below is a block of print options settings, which are exactly the same as in the Revit print settings window:
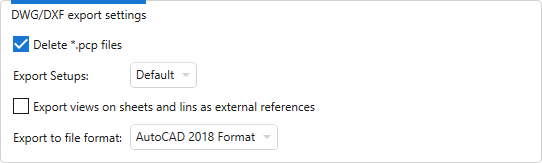
contain the following options:
Delete *.pcp files – files with the *.pcp extension created when exporting to DWG will be deleted in the export directory.
Export Setups – drop-down list of export options for the current document. Learn more about export settings.
Export views on sheets and links as external references – if this option is disabled, any Revit or DWG links in the project to be exported to a single file rather than to several files that reference each other.
Export to file format – drop-down list of export file formats.
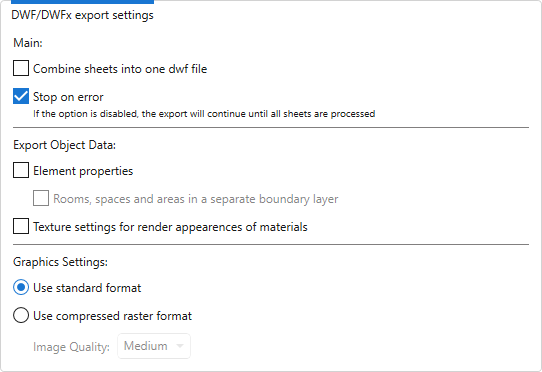
contain the following main options:
Combine sheets into one dwf file – if this option is on, all sheets are exported to a merged dwf file.
Stop on error – if the option is disabled, the export will continue until all sheets are processed.
The Export Object Data and Graphics Settings blocks repeat the similar settings block from the Revit print settings window:
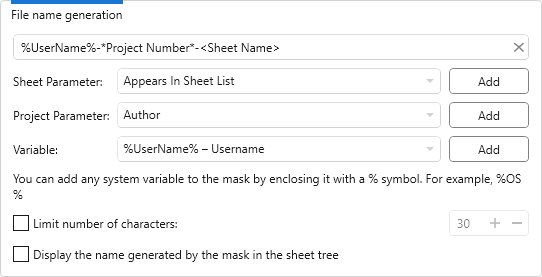
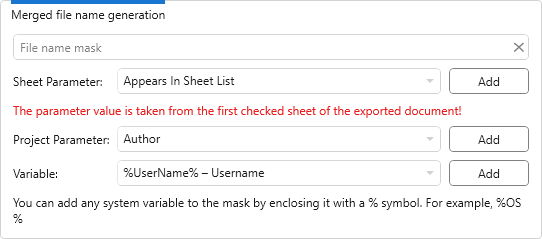
allows you to customize the names of the exported files. The group contains a text field for specifying the file name mask. The mask may contain parameters of the Sheet Parameters, Title block parameters, Project Parameters and system variables. They can be specified in the file name mask field by enclosing them in appropriate symbols: <Sheet Parameters name>, #Title block parameter name#, *Project Parameter name*, %system variable name%. You can use system parameter name (BuiltInParameter) as parameter name. You can also quickly add the above mask elements by using the drop-down lists Sheet Parameter, Project Parameter, and Variables, and clicking Add.
Below the File name mask text field there is a drop-down list of the sheet parameters, where you can quickly add a parameter to the file name mask by clicking the Add button.
If file name mask is left blank, files will be exported with standard names, which depend on the format in which the export is made.
It is also possible to set a limit on the number of characters in the file name, remove Unicode control characters from the filename, and display the masked name in the sheet tree by enabling the corresponding options.
apply to merged PDF and merged DWF/DWFx and are similar to the file name generation setting:
When you close the settings tab, the specified settings are checked and the selected printer is initialized. If a printer is selected for the first time, the necessary printer settings will be made, including the addition of print formats. In this case, the plugin may hang up briefly.
Supported PDF printers
Watermark
When exporting (printing) to PDF, it is acceptable to add a watermark to a sheet. To add a watermark, use Organization Settings.


