Icon
Related news and articles
Using
The plugin contains a set of tools to perform an Apartment Typology. The tools are presented as tabs in a logical sequence of execution:
Each tab contains switchable instructions.
The "Functional purpose" parameter, to be completed manually, is used for identification of rooms to be processed.
Example Excel file with the room matrix and apartment types – download.
To work with the plugin, you must create at least one configuration using  . Within a configuration, the main settings, sources, numbering settings, conditions for classification, and default values for parameter mapping are stored. Configurations can be duplicated
  , renamed
  , exported
  , imported
  and deleted
  using the corresponding buttons below the drop-down list of configurations.
Settings
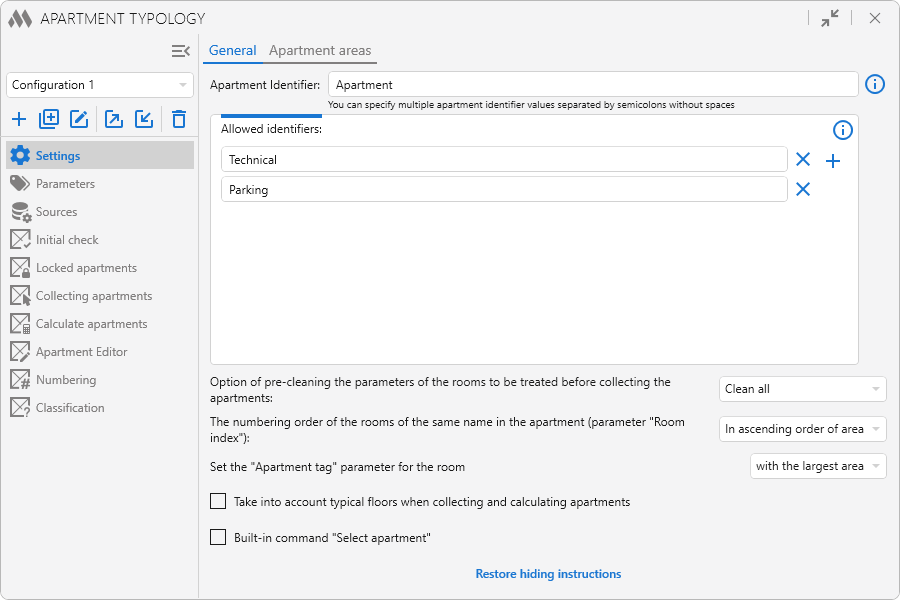
Apartment identifier – sets the value of the "Functional purpose" parameter, by which the rooms to be processed will be defined. You can specify multiple apartment identifier values separated by semicolons without spaces. The default value is "Apartment".
Allowed identifiers – the list of values that can be in the "Functional purpose" parameter, but must not be processed by the plugin algorithms.
Take into account typical floors when collecting and calculating apartments – this option allows to copy values of compartment parameters for identical floors from corresponding compartments of a typical floor specified on the Sources tab. This option is duplicated on the Collecting apartment and Calculating apartment tabs – if you enable it on any of the three tabs, it will also be enabled on the others.
Built-in command "Select apartment" – enable/disable the built-in command "Select apartment". When selecting a single room in the model with a filled apartment identifier, the "Select apartment" command will appear on the ribbon. When this command is executed, all rooms belonging to the same apartment as the selected room will be selected. Works similarly to the built-in commands ModPlus.
Restore hidden instructions – restores hidden instructions on all tabs.
Calculate areas of locked apartments – option to enable calculation of areas for blocked apartments.
Perform apartment typification – when this option is disabled, apartment typification is not performed, and previously assigned apartment types remain unchanged.
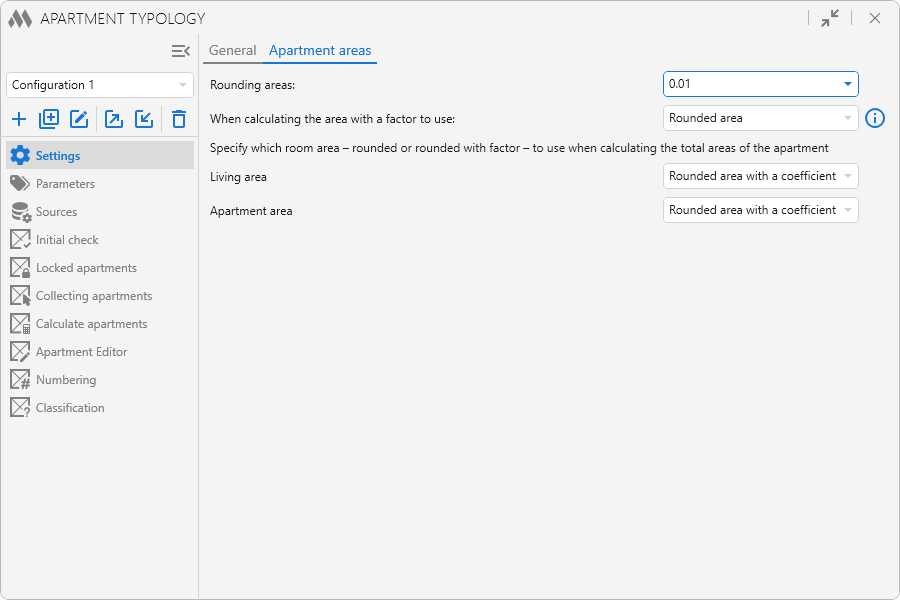
Rounding areas – specifies parameters for rounding the area when calculating. Rounding is taken into account at each step of the calculation (room area is rounded, then the calculated apartment areas are rounded).
When calculating the area with a coefficient, you can choose which area will be multiplied by the factor – rounded or the original area.
Below there are drop-down lists indicating which area – rounded without/by factor – to use for calculating living area, apartment area and total apartment area.
All these settings are duplicated on the Calculate aprtments tab.
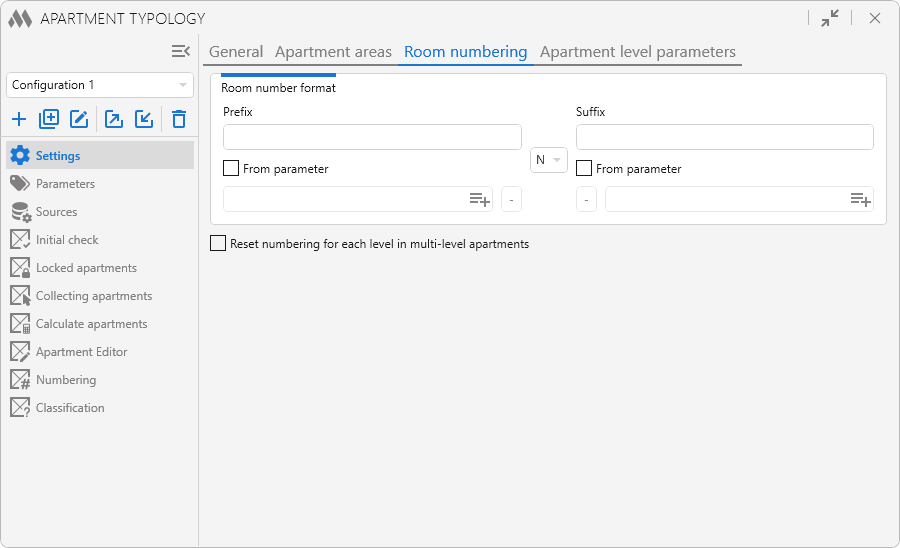
The room number is generated automatically according to the numbering priority by room name specified on the Sources tab. In the drop-down list, you can select the number format: N – without leading zeros, 0N – with one leading zero, 00N – with two leading zeros.
For the Prefix and Suffix of the number, you can:
- set a fixed text value
- enable the From parameter option and specify the parameter whose value will be used when generating the number.
The Reset numbering for each level in multi-level apartments option allows numbering to restart on each apartment level. When the option is disabled, continuous numbering is created for all levels of the apartment.
All the specified settings are duplicated on the Calculate aprtments tab.
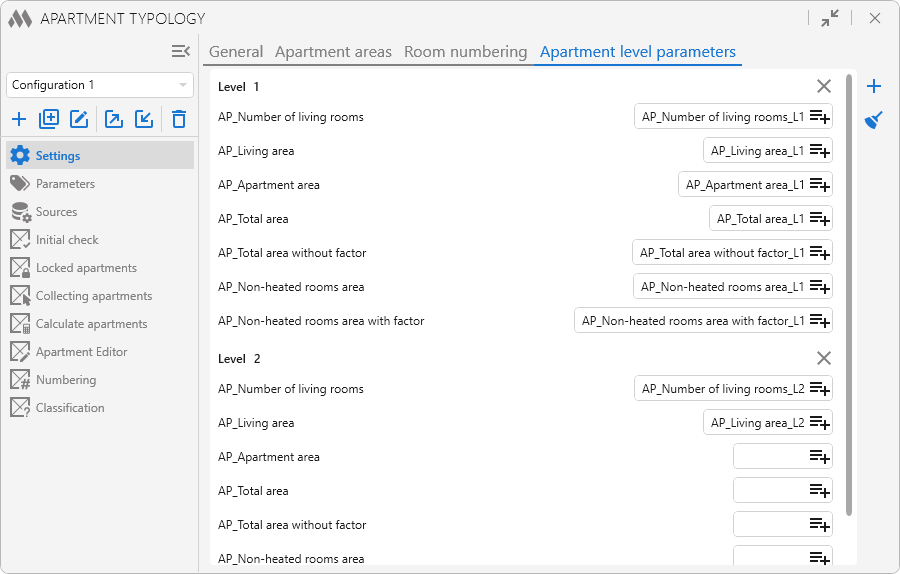
This tab is intended for configuring the parameters into which the plugin will write apartment parameter values separately for each level of multi-level apartments.
For each apartment level, you need to specify the parameters into which the corresponding values will be written. It is recommended to use parameters with the same data types as the main apartment parameters.
Parameter values by levels are filled in for all apartments in the project. For single-level apartments, the parameter values for each level will repeat the values of the main apartment parameters. For multi-level apartments, the values are calculated and written separately for each level.
All the specified settings are duplicated on the Calculate aprtments tab.
Parameters
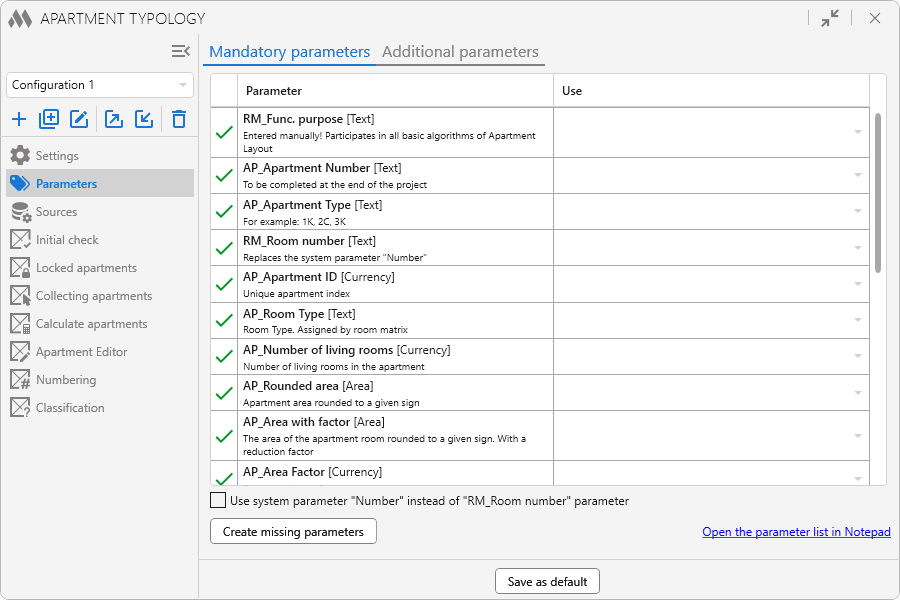
This tab contains a list of parameters that are required for the plugin to work. The list specifies the parameter name, parameter data type, and parameter description. On the right side of the list you can specify custom common parameters from the current document (parameter mapping). Parameter mapping data is stored in the document.
Parameter data types – text, area, currency – allow you to work with rooms that are in groups.
Use system parameter "Number" instead of "RM_Room number" parameter – if checked, the room number will be written to the system parameter "Number". In this case, the parameter "Room_Number" may not be added to the project.
Open parameter list in notepad – displays a list of parameters in notepad, allowing you to add parameters to the file of general parameters.
Create missing parameters – creation of all parameters missing from the list in the current document
Save as default – saves the current parameter mapping as default. If you run the plugin in another document that has parameters from the mapping, they will be automatically selected in the list.
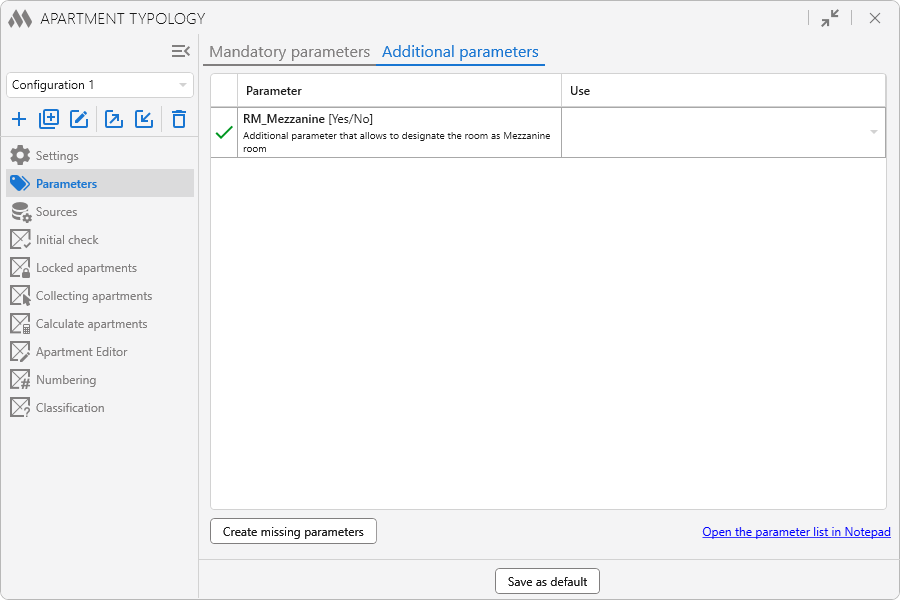
This tab contains a list of optional parameters that can be used in individual cases for plugin operation.
Sources
The sources contain the data needed to calculate the areas of the apartments, to determine apartment types and to specify typical floors.
You can create and store in the plugin several source variants (several room matrices and several tables of apartment types and typical floors). The processing will be performed on the current sources. That is, the sources selected in the drop-down lists.
You can export the current sources – the current matrix, the current table of apartment types and the current table of typical floors - to a single Excel file using the Export current sources to Excel button, and you can export all existing sources to a single Excel file using the Export all sources to Excel button.
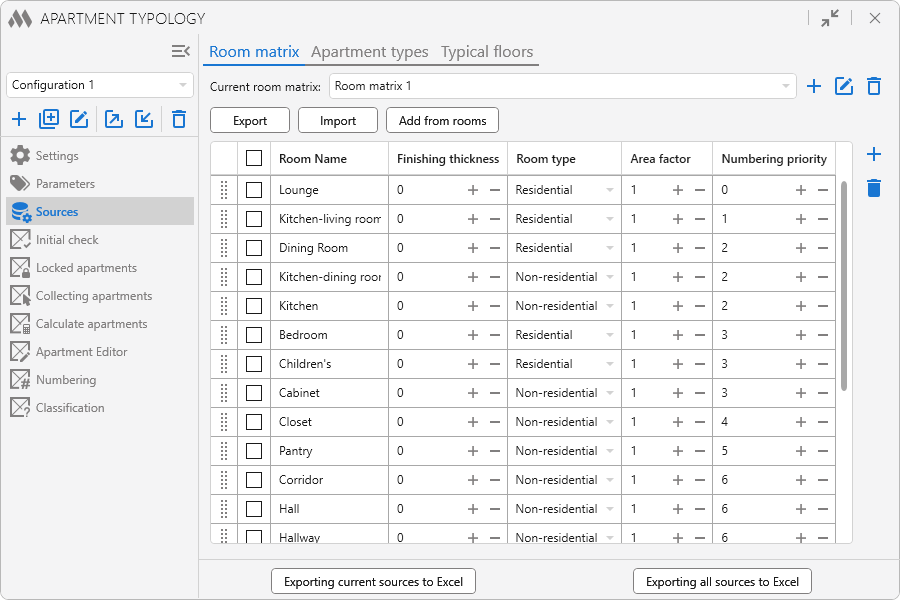
The table contains the data used for calculating the apartment areas:
- Room Name (the value of the built-in parameter "Name") is the key by which the values below are matched.
- Finishing thickness – thickness of rough finish of compartment in millimeters, which enables taking the finishing layer into account without modeling. It is written to the room parameter (AP_ Finishing thickness) and taken into account when calculating the area of the room (AP_Rounded area). If a Room Separator is used as the room boundary, the finishing layer along this boundary is not considered (starting from Revit 2020).
- Room type – drop-down list that specifies room type (Residential/Non-residential/Non-heated). It is written to the room parameter (AP_Room Type).
- Area factor – a decreasing coefficient with a valid value from 0.1 to 1.0. It is written in the room parameter (AP_Area Factor). It is taken into account when calculating the area with a coefficient (AP_Area with factor) and the area of unheated rooms with a coefficient (AP_Non-heated rooms area). It can also be taken into account when calculating the apartment area, living area and total area, if the corresponding option is specified in the settings (tab " Apartment areas").
- Numbering priority – specify the numbering priority within the apartment.
Export, Import – export/import of room matrix to/from Excel. When importing, it is possible both to overwrite the current table in full and to supplement it.
Add from rooms – adds new entries to the current table collected from rooms of the current project. Only rooms with the "Name" parameter filled in are added.
Fill functional purpose – automatically fills the "Functional purpose" parameter for rooms whose names are present in the current room matrix.
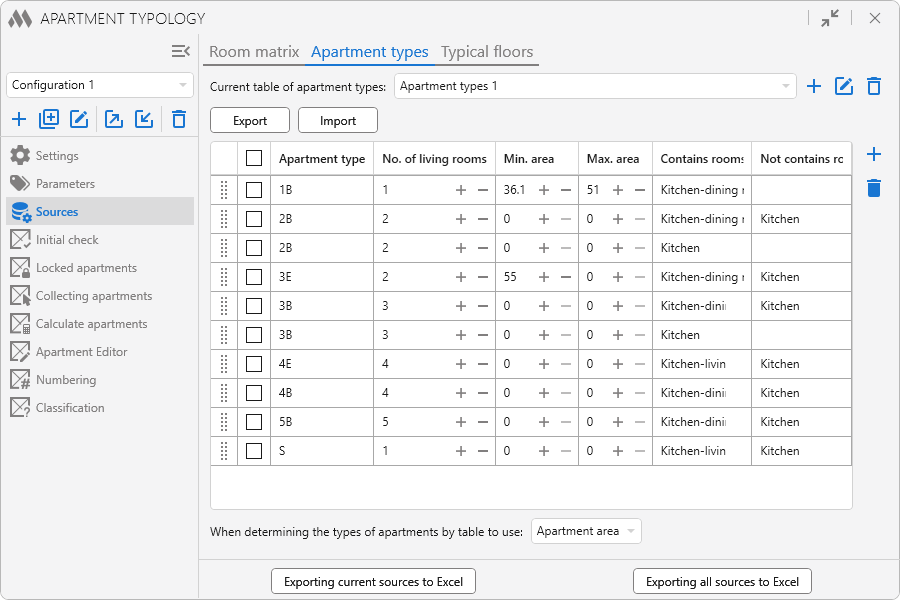
The table contains the data used to determine apartment types when calculating the area of apartments according to the following criteria:
- Number of living rooms
- Minimum area – if a value of 0 is specified, will not be taken into account
- Maximum area – if a value of 0 is entered, will not be taken into account
- Contains rooms – the list of rooms that must be present in the apartment. The rooms are to be separated by semicolons. Optional
- Not contains rooms – a list of rooms that are to be absent in the apartment. The rooms are to be separated by semi-colons. Optional
When filling in the table, it is important to note that the parameter value will be set based on the last matching condition from the table. If the room name contains parentheses, they must be escaped with a backslash "\" when setting conditions. For example, "Room (Type 1)" should be written as "Room \(Type 1\)".
Below the table there is a drop-down list, indicating what kind of area (floor, living area, total area, total area without factor), the value of which is specified in columns "Minimum area" and "Maximum area" must be used when defining the type of apartment.
Export, Import – export/import of apartment types to/from Excel. When importing, it is possible both to overwrite the current table in full and to supplement it.
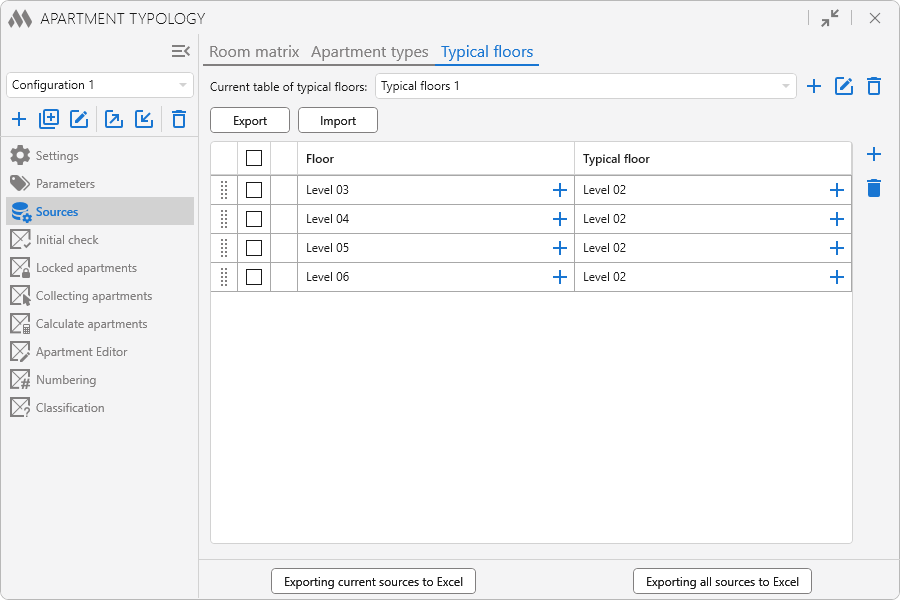
In the table for repetitive floors it is specified which floor is a typical floor for them. Floors can be defined both by level names and by level elevations.
If a typical floor is specified for a floor, then when collecting and calculating apartments, all parameters of rooms located on the specified floor will be taken from the corresponding rooms located on the typical floor.
The correspondence of a room to the type floor is determined by means of a vertical ray passed through the insertion point of this room. If a room on the standard floor intersects with this ray, they are considered to match.
Export, Import – export/import of typical floors to/from Excel. When importing, it is possible both to overwrite the current table in full and to supplement it.
All subsequent tabs become available if two conditions are met: all the necessary parameters are present in the document and the apartment identifier is specified in the settings.
Initial Check
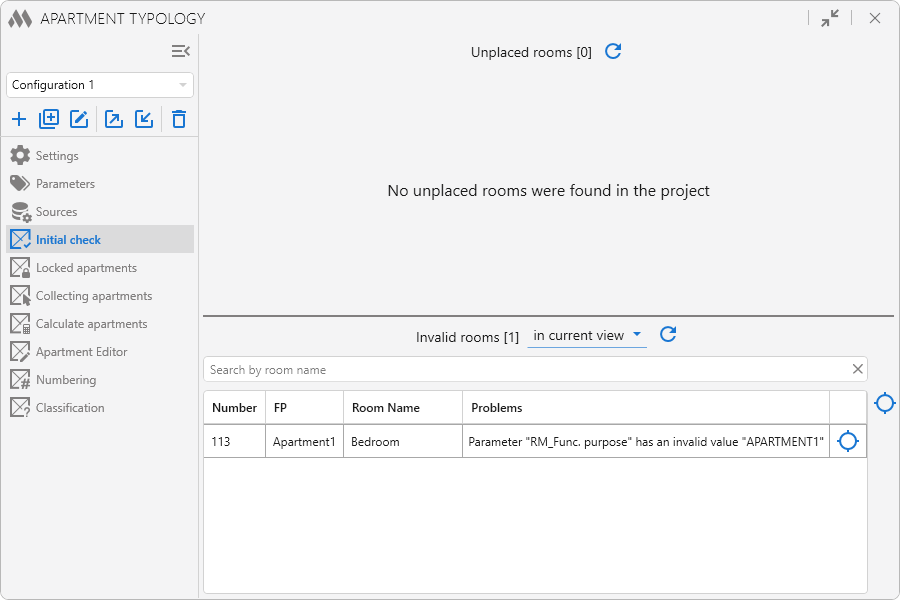
It includes checking if there are unplaced rooms in the project, checking if the "Functional purpose" parameter is filled in correctly and if the pair of "Functional purpose" + "Name" parameter values correspond to the ones defined in the room matrix.
 – deleting of selected rooms in the "Unplaced rooms" table.
 – deletion of all rooms in the table "Unplaced rooms".
 – in line: highlighting and zooming in a non-invalid room. To the right of the table – highlighting and zooming in all non-invalid rooms in the current view.
Note: if a invalid room has the problem "Functional purpose parameter has invalid value", but the value of this parameter is necessary for current project, this value should be added to the list " Allowed identifiers" on the tab "Settings".
Note: Checking of unenclosed rooms is not performed at this stage.
LOCKED APARTMENTS
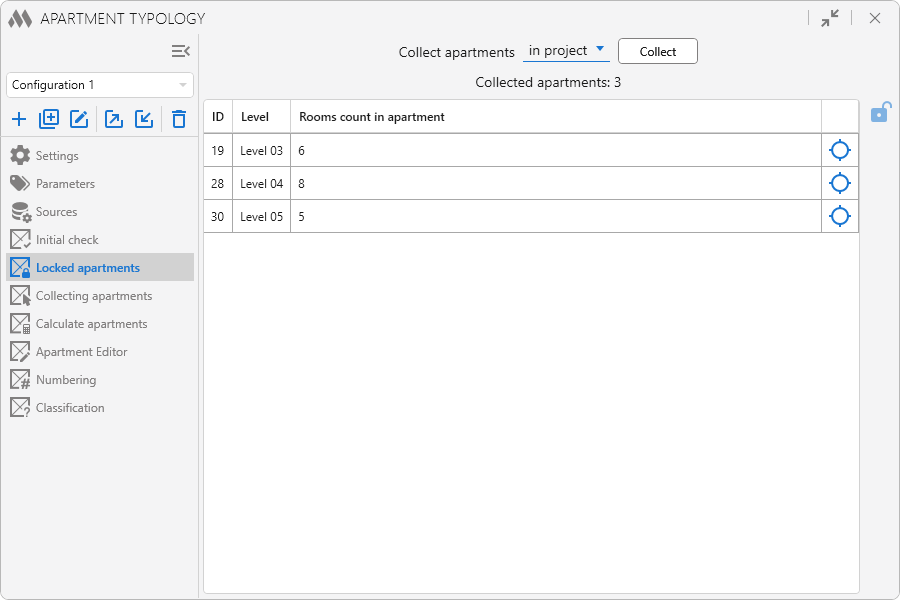
Displays the apartments whose rooms have been locked. Locked rooms will be ignored when collecting and calculating apartments, regardless of the "Functional purpose" parameter value. You can enable the calculation of the area of blocked apartments on the Settings/Apartment areas and Calculate apartments tabs.The locking of apartments is done on the Collecting apartments, Calculate apartments and Apartment Editor tabs.
To unlock the apartments, select the apartments and press the  button. You can also unlock apartments in the Apartment Editor tab.
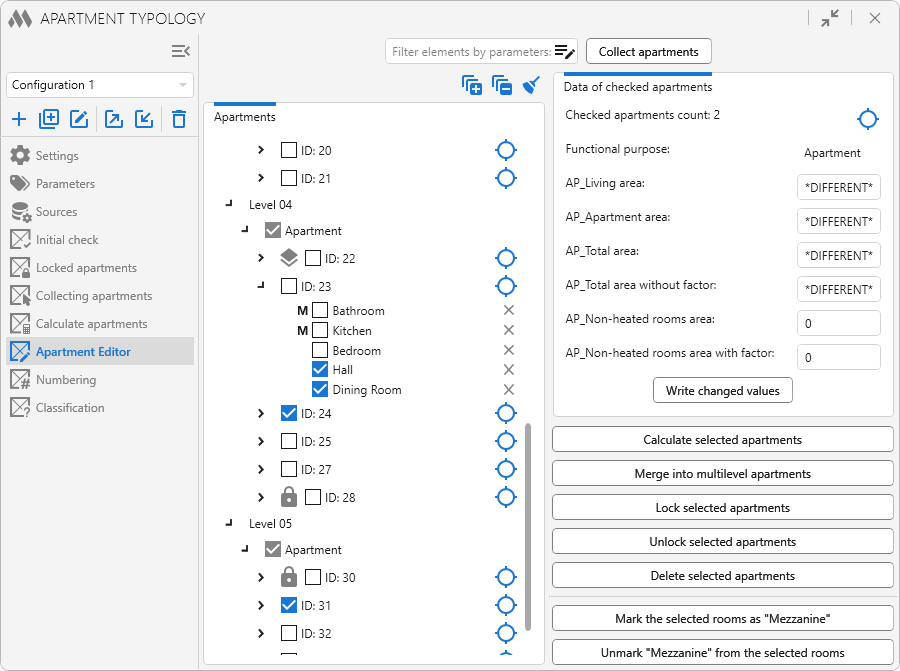
Collecting apartments
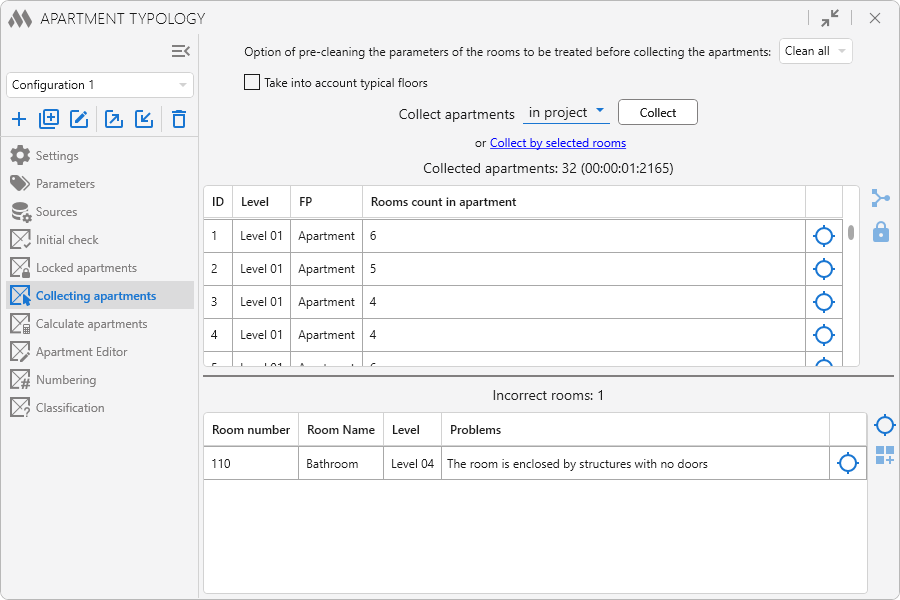
Automated collection of apartments, which is made through geometrical characteristics of rooms, taking into consideration the connection of rooms through doors and room dividers.
If the window has zero Sill Height and the Head Height more than 2m, then it is considered a door.
During apartment collection all rooms belonging to one apartment are assigned a common value in parameter "AP_Apartment ID". The value of the parameter can change when collecting apartments again.
Apartment collection can be performed on the current view, on the entire project, or on selected rooms. The Considering the filter option enables applying a room parameter filter during collecting apartments.
If the option Take into account typical floors is enabled, the collection of apartments is performed on the typical floors, and the information from the typical floor is copied for the floors corresponding to the typical floors:
- if apartment areas are collected in the project, then the typical floors are processed first. Then, if the floor is assigned a typical floor, the rooms on the typical floor are searched for by means of a vertical beam check and, if they match, the parameters are copied from the typical floor. If the floor is not assigned a typical floor, the standard processing of rooms is performed.
- If the collection is performed on the current view or if the selected rooms and the current floor are assigned to a typical floor, the properties are copied without any check. If the type floor is not collected in advance, the parameter values will be zero on the current floor.
The collection of apartments allows to identify unenclosed rooms, rooms without openings, as well as spaces without rooms in the project. Such rooms will be displayed in the list of "Invalid rooms". They can be manually added to the apartment selected above using the  .
.
Several apartments can be merged into one. To do this, select the apartments in the list and click  button to the right of the list. If the selected apartments are on different levels, they will not be merged.
Apartments can be locked. The rooms of the locked apartments will be ignored during the next apartment collection, regardless of the value of the "Functional purpose" parameter. To lock the apartments, select the apartments in the list and press the  button. The locked apartments will be removed from the current list and added to the list on the Blocked tab.
Note: it is recommended to perform a visual inspection of this stage by means of color schemes.
Calculate apartments
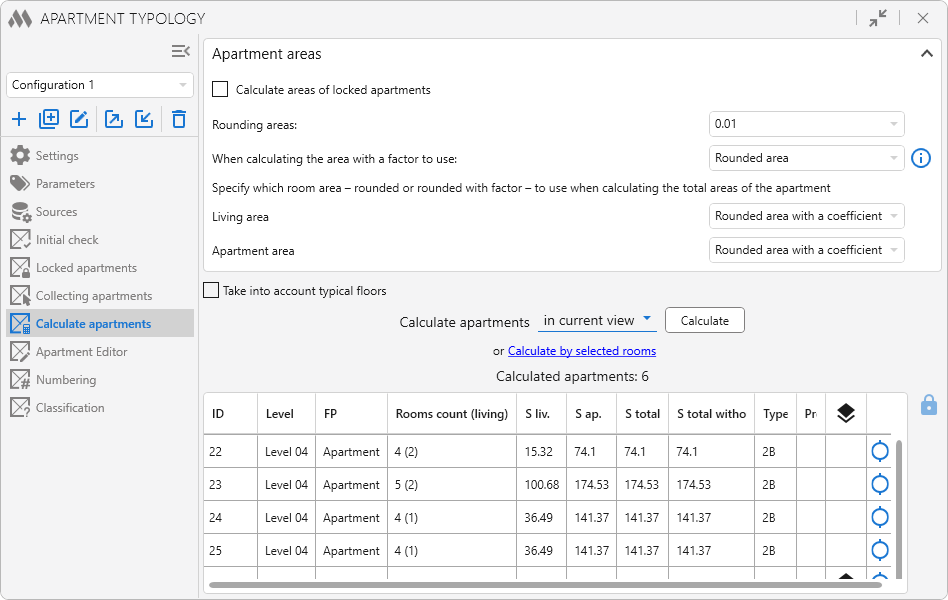
Apartment calculation includes: filling in the data from the "Room matrix" source, calculating the apartment areas, numbering the rooms in the apartment, taking into account the numbering priority, and defining the apartment type from the "Apartment types" source. All obtained values are assigned to the parameters of compartments included in the apartment.
When calculating the apartment areas, the "AP_Apartment tag" parameter is also filled in: the room of the apartment with the largest area is filled in with "1" value, the other rooms are filled in with "0" value.
Apartment calculation can be performed on the current view, on the entire project, or on selected rooms. The Considering the filter option enables applying a room parameter filter during calculation apartments.
If the option Take into account typical floors is enabled, the calculation of apartments is performed on the typical floors, and the information from the typical floor is copied for the floors corresponding to the typical floors:
- if apartment areas are calculated in the project, then the typical floors are processed first. Then, if the floor is assigned a typical floor, the rooms on the typical floor are searched for by means of a vertical beam check and, if they match, the parameters are copied from the typical floor. If the floor is not assigned a typical floor, the standard processing of rooms is performed.
- If the calculation is performed on the current view or if the selected rooms and the current floor are assigned to a typical floor, the properties are copied without any check. If the type floor is not calculated in advance, the parameter values will be zero on the current floor.
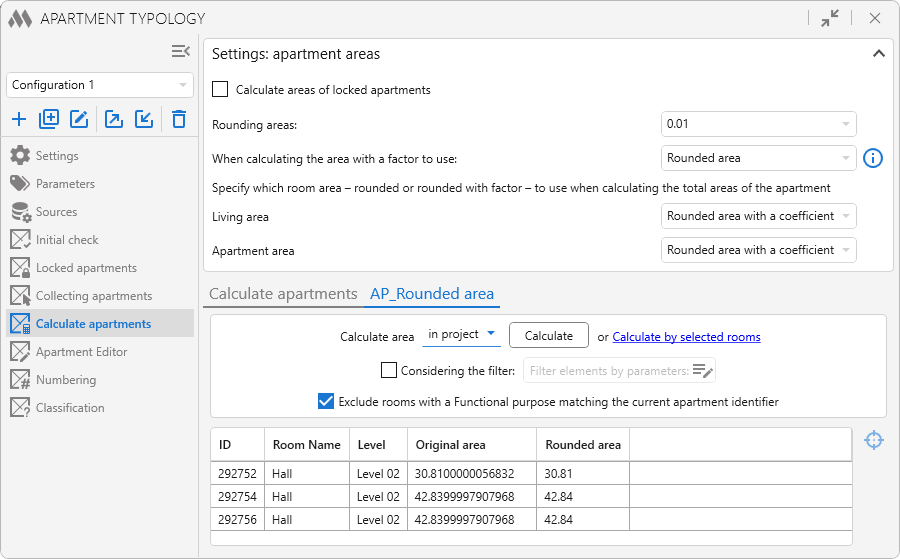
Not included in the core Apartment Typology algorithm. Allows populating the "AP_Rounded area" parameter (or similar) according to rounding settings. Recommended for rooms that do not match the current Functional purpose.
Area calculations can be performed for the current view, the entire project, or selected rooms. The Considering the filter option enables applying a room parameter filter during area calculation. Rooms with a functional purpose matching the current apartment identifier can also be excluded using the corresponding option.
Apartment editor
The apartment editor allows you to make manual changes to the values of the apartment areas, as well as to merge multilevel apartments. When merging multilevel apartments, the areas are recalculated and the value of the "AP_Levels count" parameter is filled in.
If in one file there are several sections with different level marks and multilevel apartments in them, you should use the room filter by parameters. With its help you can filter apartments located only in one section and merging multilevel apartments. In order to obtain correct results when merging apartments, it is necessary to use parameters in the filter whose values are the same for all rooms of the apartment.
When recalculating, multilevel apartments will be processed taking into account rooms from different floors, regardless of the selected option – across the entire project, in the current view, or for selected rooms. If the Take into account typical floors option is enabled, the "AP_Levels count" parameter will be reset to "1" for rooms located on typical floors.
The apartment editor also allows you to recalculate checked apartments, to lock or unlock checked apartments, and to delete checked apartments (the room parameter values will be cleared).
Individual rooms in apartments can be checked as "Mezzanine" or have this mark removed. Additionally, checked rooms can be removed from the apartment (the characteristics of the apartment will be recalculated).
Numbering
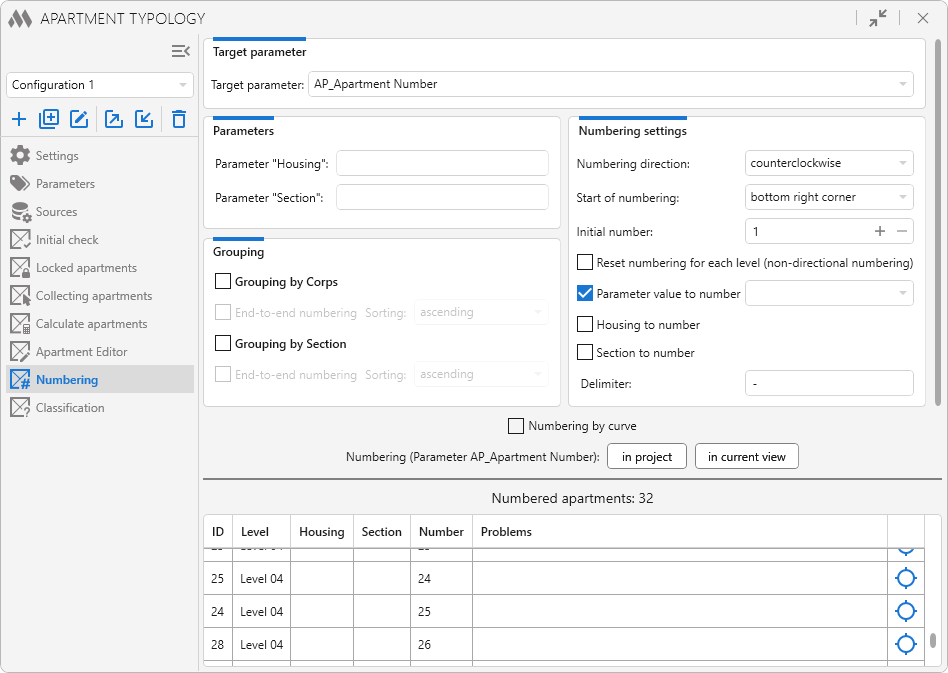
Numbering can be done by grouping the apartments by Housings and/or Sections by enabling the corresponding options and by specifying the parameter names from which to take the value of the Housing and/or Sections. In this case, it is considered that the sections are subgroups for the housings. The End-to-end numbering property means that the numbering in the next group will continue, not start from the value set in the Initial number property.
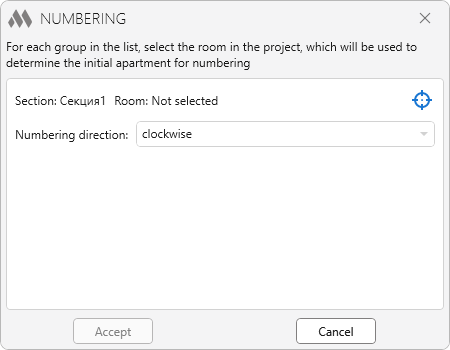
If you select the Point option in the Start of numbering property, then you will have to select the room determining from which apartment the numbering will start for each group of apartments:
Initial number sets the initial value for apartment numbering. The value may include leading zeros (for example, 01 or 005), which will be preserved and used when generating numbers.
If you enable the Reset numbering for each level (non-directional numbering) option, then at each level the numbering will start from the value specified in the Initial number property.
If the Parameter value to number option is enabled, a prefix with the specified parameter value (if any), separated by by Delimiter, is added to the apartment number. If the Housing to number and Section to number options are enabled, the same prefixes will be added, according to the parameters specified in the grouping. All values are added in the sequence "Housing-Section-Parameter-Number".
You can number the apartments in the current view or in the whole project.
Numbering by curve – allows to number the apartments, along the curve that crosses the apartments. The curve can be a Detail line or a Model line. When numbering by curve, the grouping by Housings and Sections, as well as the Numbering direction and Start of numbering are not taken into account. When numbering throughout the project, the selected curve will be used on all floors.
The number of the apartments is set to the specified Target parameter.
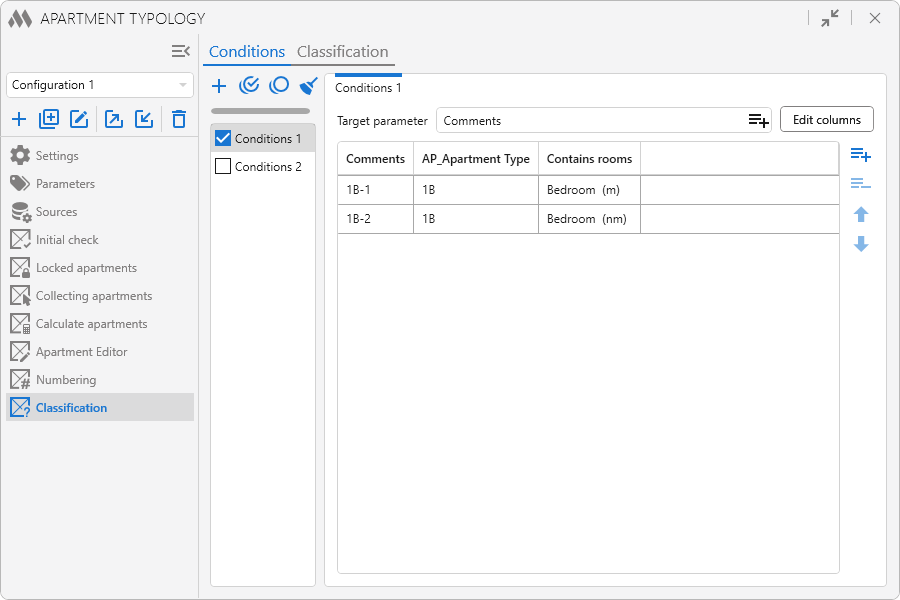
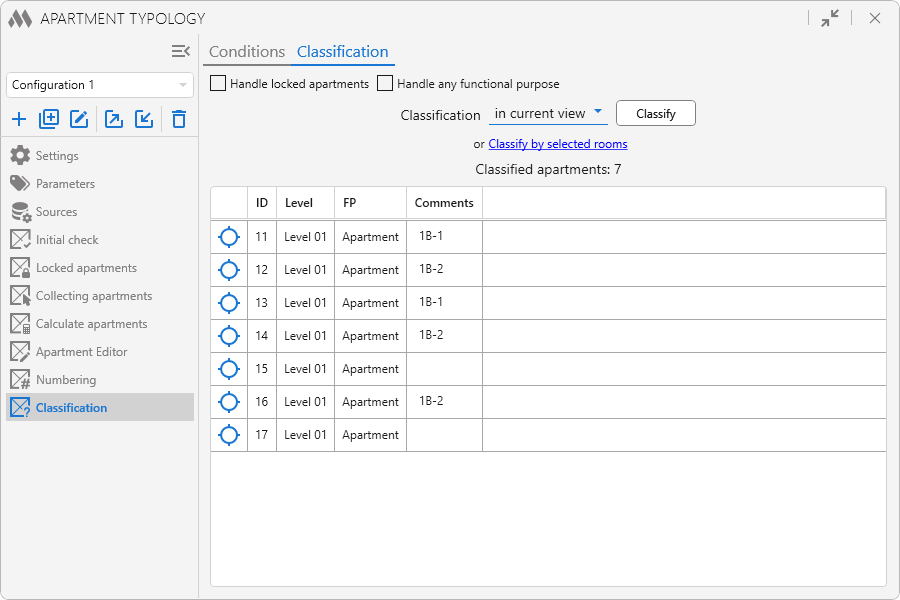
CLASSIFICATION
Classification allows you to populate specific apartment parameters based on their characteristics.

First, you need to create a new conditions table using the . A list of tables will appear on the left. When selecting a table from the list, a customizable conditions table will open on the right. Using the buttons above the table list, you can check all items in the list  , uncheck all items
  and clear the table list . When hovering over an individual item in the list, buttons will appear that allow you to rename
  or delete
 .png) the selected table.
the selected table.
When selecting a table from the list, a customizable conditions table will open on the right. In the first column, you always specify the value of the target parameter, which must be indicated in the Target Parameter field above the table. The second and subsequent columns should contain conditions for populating the target parameter. These columns are configured using the Edit columns button:
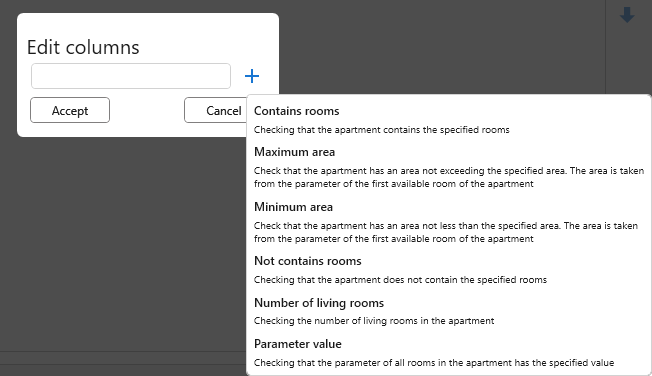
In the opened window, clicking will display a list of available conditions to choose from. After selecting certain conditions, you may need to specify the parameter value for the condition (e.g., for the "Maximum area" condition, you need to specify which apartment area parameter the condition will take into account). Added conditions can be dragged in the list or deleted:
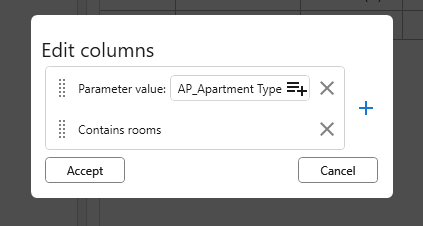
Once the Apply button is clicked, the corresponding columns will be added to the conditions table.
Next, you need to add the required number of rows to the conditions table using the  button and fill them in. If the room name contains parentheses, they must be escaped with a backslash "\" when setting conditions. For example, "Room (Type 1)" should be written as "Room \(Type 1\)". Rows in the table can be moved using
 .
.
When filling in the table, keep in mind that the value of the target parameter is determined by the last matching condition in the table. For example, if you need to classify apartments by the number of bedrooms, set the following condition:
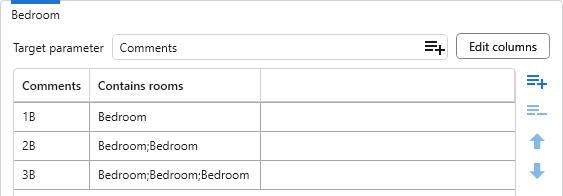
If an apartment has 4 or 5 bedrooms, the target parameter will be assigned the value "3B" since it is the last matching condition in the table.
However, if the conditions are set as follows:
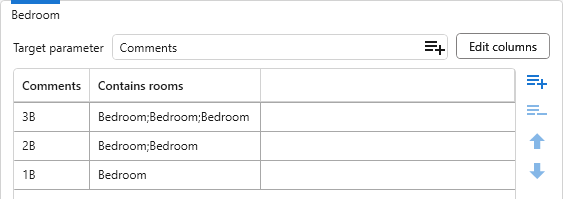
Then, the last matching condition for all apartments with at least one bedroom will be the value "1B", as it is the last matching condition in the table.
Classification is performed according to the specified condition tables from the "Conditions" tab. If the apartment to be checked does not fall under any row of the condition table, the corresponding target parameter will be cleared.
The option Handle locked apartments allows to fill in the target parameters of locked apartments.
The option Handle any functional purpose allows to classify rooms with any functional purpose, if the apartment identifier is filled in.
If errors are detected during the classification process, error messages and a button to open the event log will appear at the bottom of the window.
AUTO CALCULATION
Command to operate the automatic recalculation service that:
- performs apartment area recalculation and apartment type definition when the geometry of the rooms included in the apartment changes
- performs full recalculation (completion according to the room matrix, area calculation, calculation of number of living rooms, numbering of rooms, defining the type of apartment) after deletion of rooms, included in the apartment
The automatic recalculation service does not take into account typical floors. If the service is enabled, the parameters will be recalculated for apartments of all floors when geometry changes or rooms are removed.
The automatic recalculation service only processes rooms with a filled in "AP_Apartment ID" parameter.
The automatic recalculation service works even after the license validity period has expired, as long as the rooms have a full "AP_Apartment ID" parameter.
The automatic recalculation service only processes apartments whose functional purpose is equal to the current "Apartment identifier". For example, if the function purpose of the apartment is "Office" and the current identifier in the settings is " Apartments", the apartment will not be recalculated.


